Asus VENTO 3600 Vento3600 User''''s Manual for English Edition - Page 31
flushed to the chassis front
 |
View all Asus VENTO 3600 manuals
Add to My Manuals
Save this manual to your list of manuals |
Page 31 highlights
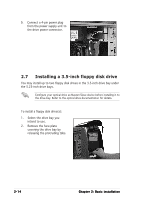
3. Using a screwdriver, push the knock down metal cover in and out of the chassis until it is removed. 3. Slide the drive bay lock to the right, towards the sign to unlock the drive bay. 4. Carefully insert the floppy disk drive into the bay, then push it inward until it is completely flushed to the chassis front panel. ASUS VENTO 3600 2-15
-
 1
1 -
2
-
3
-
4
-
5
-
6
-
7
-
8
-
9
-
10
-
11
-
12
-
13
-
14
-
15
-
16
-
17
-
18
-
19
-
20
-
21
-
22
-
23
-
24
-
25
-
 26
26 -
 27
27 -
 28
28 -
 29
29 -
 30
30 -
 31
31 -
 32
32 -
 33
33 -
 34
34 -
 35
35 -
 36
36
 |
 |

2-15
2-15
2-15
2-15
2-15
ASUS VENTO 3600
ASUS VENTO 3600
ASUS VENTO 3600
ASUS VENTO 3600
ASUS VENTO 3600
3.
Using a screwdriver, push the
knock down metal cover in
and out of the chassis until it
is removed.
4.
Carefully insert the floppy disk
drive into the bay, then push
it inward until it is completely
flushed to the chassis front
panel.
3.
Slide the drive bay lock to the
right, towards the
sign to
unlock the drive bay.