Asus VM40B VM40B User's Manual - Page 22
Upgrading hard disk drives, Installing a 3.5-inch Serial ATA HDD - upgrade
 |
View all Asus VM40B manuals
Add to My Manuals
Save this manual to your list of manuals |
Page 22 highlights
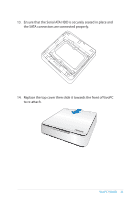
Upgrading hard disk drives You can either install a 3.5-inch Serial ATA hard disk drive (HDD) or a 2.5-inch SSD in your VivoPC. When installing a 2.5-inch SSD, use the bundled 2.5-inch SSD to 3.5inch drive tray adapter to conveniently secure your 2.5-inch SSD to the VivoPC's 3.5-inch drive bay. Installing a 3.5-inch Serial ATA HDD To install a 3.5-inch Serial ATA HDD: 1. Turn off your VivoPC. 2. Disconnect all cables and peripherals. 3. Place the VivoPC on a stable and flat surface. 4. Press down latch at the rear panel to release the top cover. 5. Slide the top cover towards the rear of VivoPC until it is detached from the chassis. DHD22 VivoPC VM40B 3.53".5H"DHD
-
 1
1 -
2
-
3
-
4
-
5
-
6
-
7
-
8
-
9
-
10
-
11
-
12
-
13
-
14
-
15
-
16
-
 17
17 -
 18
18 -
 19
19 -
 20
20 -
 21
21 -
 22
22 -
 23
23 -
 24
24 -
 25
25 -
 26
26 -
 27
27 -
28
-
29
-
30
-
31
-
32
-
33
-
34
-
35
-
36
-
37
-
38
-
39
-
40
-
41
-
42
-
43
-
44
-
45
-
46
-
47
-
48
-
49
-
50
-
51
-
52
 |
 |

22
VivoPC VM40B
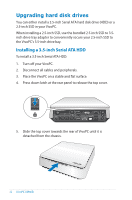
Upgrading hard disk drives
You can either install a 3.5-inch Serial ATA hard disk drive (HDD) or a
2.5-inch SSD in your VivoPC.
When installing a 2.5-inch SSD, use the bundled 2.5-inch SSD to 3.5-
inch drive tray adapter to conveniently secure your 2.5-inch SSD to
the VivoPC's 3.5-inch drive bay.
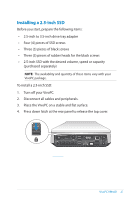
Installing a 3.5-inch Serial ATA HDD
To install a 3.5-inch Serial ATA HDD:
1.
Turn off your VivoPC.
2.
Disconnect all cables and peripherals.
3.
Place the VivoPC on a stable and flat surface.
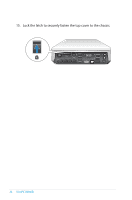
4.
Press down latch at the rear panel to release the top cover.
5.
Slide the top cover towards the rear of VivoPC until it is
detached from the chassis.