Asus Z9NR-D12 User Guide - Page 105
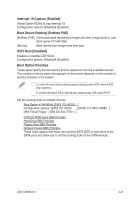
Interrupt 19 Capture [Enabled], Boot Device Seeking [Endless PXE], UEFI Boot [Disabled]
 |
View all Asus Z9NR-D12 manuals
Add to My Manuals
Save this manual to your list of manuals |
Page 105 highlights
Interrupt 19 Capture [Enabled] Allows Option ROMs to trap interrupt 19. Configuration options: [Disabled] [Enabled] Boot Device Seeking [Endless PXE] [Endless PXE] Continuous seek remote boot image until boot image found or user abort (press Ctrl+Alt+Del). [Normal] Seek remote boot image once then stop. UEFI Boot [Disabled] Enables or disables UEFI Boot. Configuration options: [Disabled] [Enabled] Boot Option Priorities These items specify the boot device priority sequence from the available devices. The number of device items that appears on the screen depends on the number of devices installed in the system. • To select the boot device during system startup, press when ASUS Logo appears. • To access Windows OS in Safe Mode, please press after POST. Set the booting order of network devices. Boot Option #1/#2/#3/#4 [SATA P2: ASUS ...] Configuration options: [SATA P2: ASUS ...] [SATA P3: WDC WD80...] [AMI Virtual Floppy...] [IBA GE Slot 0700 v...] CD/DVD ROM Drive BBS Priorities Hard Drive BBS Priorities Floppy Drive BBS Priorities Network Device BBS Priorities These items appear only when you connect SATA ODD or hard drive to the SATA ports and allow you to set the booting order of the SATA devices. ASUS Z9NR-D12 4-41
-
 1
1 -
2
-
3
-
4
-
5
-
6
-
7
-
8
-
9
-
10
-
11
-
12
-
13
-
14
-
15
-
16
-
17
-
18
-
19
-
20
-
21
-
22
-
23
-
24
-
25
-
26
-
27
-
28
-
29
-
30
-
31
-
32
-
33
-
34
-
35
-
36
-
37
-
38
-
39
-
40
-
41
-
42
-
43
-
44
-
45
-
46
-
47
-
48
-
49
-
50
-
51
-
52
-
53
-
54
-
55
-
56
-
57
-
58
-
59
-
60
-
61
-
62
-
63
-
64
-
65
-
66
-
67
-
68
-
69
-
70
-
71
-
72
-
73
-
74
-
75
-
76
-
77
-
78
-
79
-
80
-
81
-
82
-
83
-
84
-
85
-
86
-
87
-
88
-
89
-
90
-
91
-
92
-
93
-
94
-
95
-
96
-
97
-
98
-
99
-
 100
100 -
 101
101 -
 102
102 -
 103
103 -
 104
104 -
 105
105 -
 106
106 -
 107
107 -
 108
108 -
 109
109 -
 110
110 -
111
-
112
-
113
-
114
-
115
-
116
-
117
-
118
-
119
-
120
-
121
-
122
-
123
-
124
-
125
-
126
-
127
-
128
-
129
-
130
-
131
-
132
-
133
-
134
-
135
-
136
-
137
-
138
-
139
-
140
-
141
-
142
-
143
-
144
-
145
-
146
-
147
-
148
-
149
-
150
-
151
-
152
-
153
-
154
-
155
-
156
-
157
-
158
-
159
-
160
-
161
-
162
-
163
-
164
-
165
-
166
-
167
-
168
-
169
-
170
-
171
-
172
-
173
-
174
-
175
-
176
-
177
-
178
-
179
-
180
-
181
-
182
-
183
-
184
-
185
-
186
-
187
-
188
-
189
-
190
 |
 |