Asus a7n8xx Motherboard DIY Troubleshooting Guide - Page 33
Updating BIOS procedures - memory
 |
View all Asus a7n8xx manuals
Add to My Manuals
Save this manual to your list of manuals |
Page 33 highlights
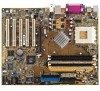
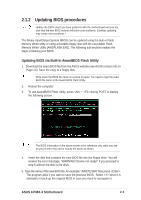
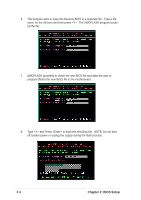
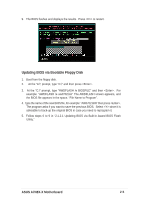
2.1.2 Updating BIOS procedures Update the BIOS only if you have problems with the motherboard and you are sure that the new BIOS revision will solve your problems. Careless updating may create more problems ! The Binary Input/Output System (BIOS) can be updated using the built-in Flash Memory Writer utility or using a bootable floppy disk with the executable Flash Memory Writer Utility (AWDFLASH.EXE). The following sub-sections explain the steps in flashing your BIOS. Updating BIOS via Built-in AwardBIOS Flash Utility 1. Download the latest BIOS file from the ASUS website (see ASUS contact info on Page viii). Save the copy to a floppy disk. Write down the BIOS file name on a piece of paper. You need to type the exact BIOS file name at the Award BIOS Flash Utility. 2. Reboot the computer. 3. To use AwardBIOS Flash Utility, press + during POST to display the following screen. The BIOS information in the above screen is for reference only. what you see on your screen may not be exactly the same as shown. 4. Insert the disk that contains the new BIOS file into the floppy drive. You will receive the error message, "WARNING! Device not ready!" if you proceed to step 5 without the disk in the drive. 5. Type the name of the new BIOS file, for example: "AW0702.BIN" then press . The program asks if you want to save the previous BIOS. Select since it is advisable to back-up the original BIOS in case you need to reprogram it. ASUS A7N8X-X Motherboard 2-3
-
 1
1 -
2
-
3
-
4
-
5
-
6
-
7
-
8
-
9
-
10
-
11
-
12
-
13
-
14
-
15
-
16
-
17
-
18
-
19
-
20
-
21
-
22
-
23
-
24
-
25
-
26
-
27
-
 28
28 -
 29
29 -
 30
30 -
 31
31 -
 32
32 -
 33
33 -
 34
34 -
 35
35 -
 36
36 -
 37
37 -
 38
38 -
39
-
40
-
41
-
42
-
43
-
44
-
45
-
46
-
47
-
48
-
49
-
50
-
51
-
52
-
53
-
54
-
55
-
56
-
57
-
58
-
59
-
60
 |
 |