Asus a7v600x A7V600-X User's manual - Page 37
ASUS A7V600-X motherboard - a7v600 x bios update
 |
View all Asus a7v600x manuals
Add to My Manuals
Save this manual to your list of manuals |
Page 37 highlights
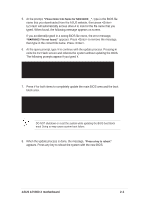
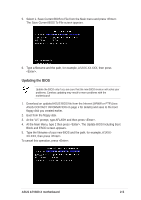
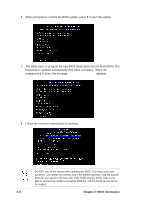
5. At the prompt, "Please Enter File Name for NEW BIOS: _", type in the BIOS file name that you downloaded from the ASUS website, then press . EZ Flash will automatically access drive A to look for the file name that you typed. When found, the following message appears on screen. If you accidentally typed in a wrong BIOS file name, the error message, "WARNING! File not found." appears. Press to remove the message, then type in the correct file name. Press . 6. At the query prompt, type Y to continue with the update process. Pressing N exits the EZ Flash screen and reboots the system without updating the BIOS. The following prompts appear if you typed Y. [BIOS Information in File] BIOS Version: A7V600-X Boot Block WARNING! Continue to update the BIOS (Y/N)? _ 7. Press Y for both items to completely update the main BIOS area and the boot block area. Flash Memory: SST 49LF004 1. Update Main BIOS area 2. Update Boot Block area (Y/N)? _ (Y/N)? _ DO NOT shutdown or reset the system while updating the BIOS boot block area! Doing so may cause system boot failure. 8. When the update process is done, the message, "Press a key to reboot" appears. Press any key to reboot the system with the new BIOS. ASUS A7V600-X motherboard 2-3
-
 1
1 -
2
-
3
-
4
-
5
-
6
-
7
-
8
-
9
-
10
-
11
-
12
-
13
-
14
-
15
-
16
-
17
-
18
-
19
-
20
-
21
-
22
-
23
-
24
-
25
-
26
-
27
-
28
-
29
-
30
-
31
-
 32
32 -
 33
33 -
 34
34 -
 35
35 -
 36
36 -
 37
37 -
 38
38 -
 39
39 -
 40
40 -
 41
41 -
 42
42 -
43
-
44
-
45
-
46
-
47
-
48
-
49
-
50
-
51
-
52
-
53
-
54
-
55
-
56
-
57
-
58
-
59
-
60
-
61
-
62
-
63
-
64
-
65
-
66
-
67
-
68
-
69
-
70
-
71
-
72
-
73
-
74
-
75
-
76
-
77
-
78
 |
 |
