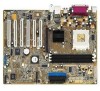
Asus a7v600x A7V600-X User's manual - Page 46
Legacy Diskette A, B [1.44M, 3.5 in.] - ram
 |
View all Asus a7v600x manuals
Add to My Manuals
Save this manual to your list of manuals |
Page 46 highlights
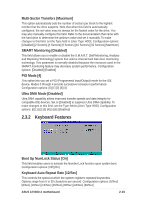
Legacy Diskette A, B [1.44M, 3.5 in.] Sets the type of floppy drive installed. Configuration options: [None] [360K, 5.25 in.] [1.2M , 5.25 in.] [720K , 3.5 in.] [1.44M, 3.5 in.] [2.88M, 3.5 in.] Floppy 3 Mode Support [Disabled] This is required to support older Japanese floppy drives. The Floppy 3 Mode feature allows reading and writing of 1.2MB (as opposed to 1.44MB) on a 3.5-inch diskette. Configuration options: [Disabled] [Enabled] Language [English US] This field allows you to choose the BIOS language version from the available options. Chassis Intrusion Detection [Disabled] This field allows you to enable or disable the chassis intrusion detection feature. Supervisor Password [Disabled] / User Password [Disabled] These fields allow you to set passwords. To set a password, highlight the appropriate field and press . Type in a password then press . You can type up to eight alphanumeric characters. Symbols and other characters are ignored. To confirm the password, type the password again and press . The password is now set to [Enabled]. This password allows full access to the BIOS Setup menus. To clear the password, highlight this field and press . The same dialog box as above appears. Press . The password is set to [Disabled]. Make a copy of the original BIOS on a bootable floppy disk before setting passwords. You will need to upload the BIOS file in case you erase the CMOS RAM in the future. A note about passwords The BIOS Setup program allows you to specify passwords in the Main menu. The passwords control access to the BIOS during system startup. Passwords are not case sensitive, meaning, passwords typed in either uppercase or lowercase letters are accepted. The BIOS Setup program allows you to specify two different passwords: a Supervisor password and a User password. If you did not set a Supervisor password, anyone can access the BIOS Setup program. If you did, the Supervisor password is required to enter the BIOS Setup program and to gain full access to the configuration fields. Forgot the password? If you forget your password, you can clear it by erasing the CMOS Real Time Clock (RTC) RAM. The RAM data containing the password information is powered by the onboard button cell battery. If you need to erase the CMOS RAM, unplug the all the power cables and remove the button cell battery. Re-install the battery after about 2 seconds, then power up the system. Refer to section "2.1 Managing and updating your BIOS" on how to update the BIOS. 2-12 Chapter 2: BIOS Information
-
 1
1 -
2
-
3
-
4
-
5
-
6
-
7
-
8
-
9
-
10
-
11
-
12
-
13
-
14
-
15
-
16
-
17
-
18
-
19
-
20
-
21
-
22
-
23
-
24
-
25
-
26
-
27
-
28
-
29
-
30
-
31
-
32
-
33
-
34
-
35
-
36
-
37
-
38
-
39
-
40
-
 41
41 -
 42
42 -
 43
43 -
 44
44 -
 45
45 -
 46
46 -
 47
47 -
 48
48 -
 49
49 -
 50
50 -
 51
51 -
52
-
53
-
54
-
55
-
56
-
57
-
58
-
59
-
60
-
61
-
62
-
63
-
64
-
65
-
66
-
67
-
68
-
69
-
70
-
71
-
72
-
73
-
74
-
75
-
76
-
77
-
78
 |
 |