Audiovox APS95BT2 Programming Manual - Page 3
Quick Reference, Battery Replacement - case only
 |
UPC - 044476013294
View all Audiovox APS95BT2 manuals
Add to My Manuals
Save this manual to your list of manuals |
Page 3 highlights
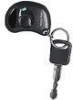
11. The dash mounted LED will flash 3 times, and the siren will "chirp" indicating that the system is ready to accept programming for channel 3. (APS 350) 12. Press and hold the remaining transmitter button function. The siren will emit a long "chirp" to confirm that programming of channel 3 was successful. 13. To exit program mode, either turn the ignition key to the off position, or move the valet switch on then off one additional time. This is indicated by one short chirp then one long "chirp" from the siren. NOTE: If programming to a Keyless Entry (non alarm) unit, there will be NO chirp indication. QUICK REFERENCE: You can program any individual channel, without reprogramming all channels, by following the quick reference chart below. CHANNEL 1 VALET SWITCH ON then OFF 3 Times LED 1 Flash 2 ON then OFF 4 Times 2 Flashes 3 ON then OFF 5 Times 3 Flashes After the desired channel is programmed, turn the ignition key to the off position to exit programming mode. BATTERY REPLACEMENT: The transmitter incorporates a small red LED built into the case. This LED can be used to indicate battery condition. You will notice a decrease in transmitter range as the battery condition deteriorates. To replace the battery... 1. Remove the transmitter cover by removing the small screw from the back of the transmitter case. 2. Remove the discharged battery, making note of the orientation of the + and - contacts and dispose of the battery properly. 3. Install the new (type GP23A) battery, taking care to orient the + and contacts properly. 4. Replace the transmitter cover, taking care not to damage the LED or switches on the circuit board. 3 128 4624 3 12
-
 1
1 -
 2
2 -
 3
3 -
 4
4 -
 5
5 -
 6
6 -
 7
7 -
 8
8 -
 9
9 -
10
-
11
-
12
 |
 |
