Audiovox DT102A Operation Manual
Audiovox DT102A - DVD Shuttle Manual
 |
UPC - 044476030758
View all Audiovox DT102A manuals
Add to My Manuals
Save this manual to your list of manuals |
Audiovox DT102A manual content summary:
- Audiovox DT102A | Operation Manual - Page 1
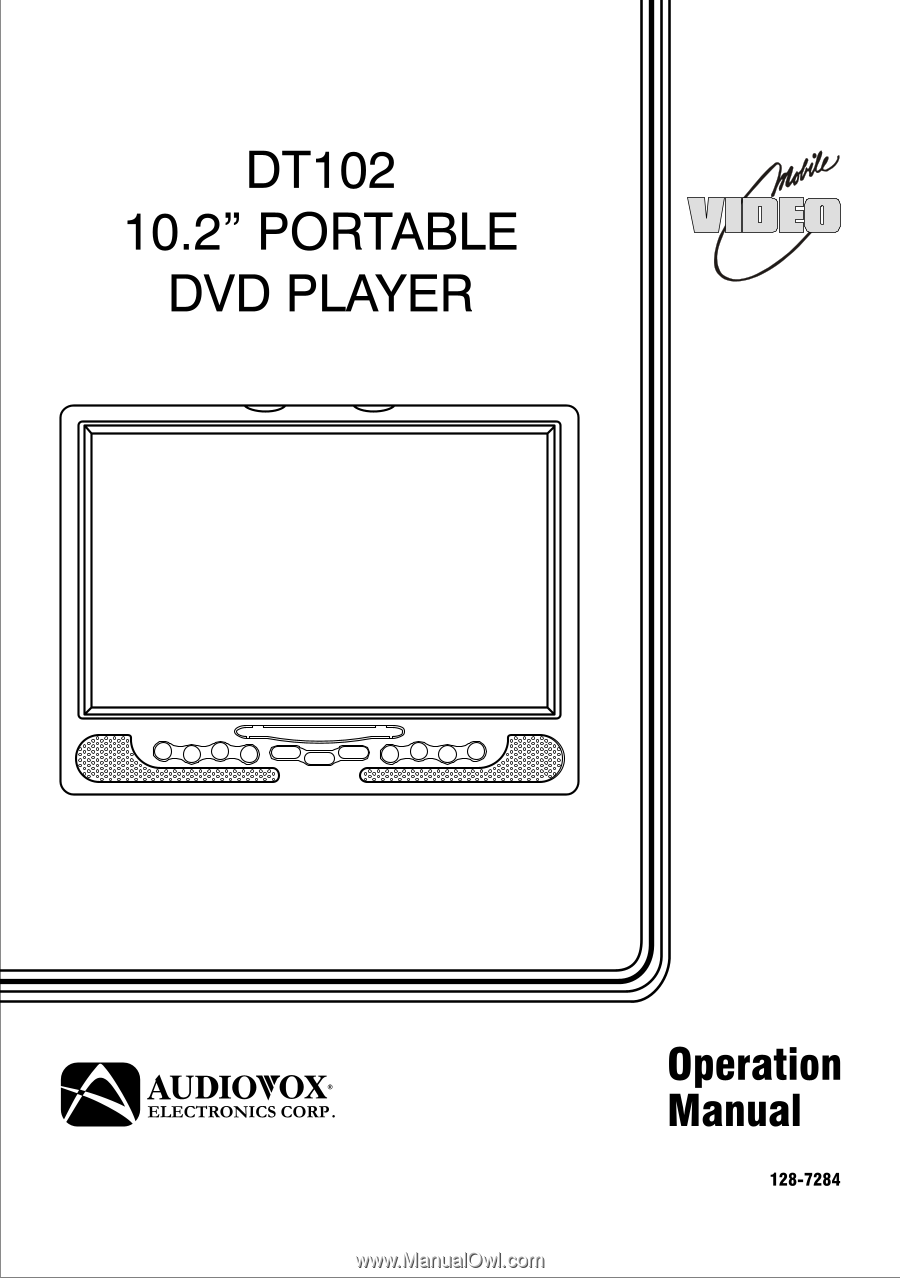
DT102 10.2" PORTABLE DVD PLAYER Operation ® Manual 128-7284 - Audiovox DT102A | Operation Manual - Page 2
be used in a variety of applications. It can be used as portable DVD player or when installed into the available docking stations as a home or mobile DVD player. The DVD Player is constructed to provide years of reliable, trouble-free service, and is compact so that you can take it with you anywhere - Audiovox DT102A | Operation Manual - Page 3
instructions unless you are qualified to do so. There are no user-serviceable parts inside. Refer all servicing to qualified service personnel. Servicing should be done only by qualified service personnel. 4. Cleaning DVD Player When cleaning, make sure the system is unplugged from the power - Audiovox DT102A | Operation Manual - Page 4
In This Package 1) Shuttle Portable DVD Player with 10.2" LCD Monitor (P/N: 136-3886) ~ 1pc 2) Headrest Mounting Bag (P/N: 126-1324) ~ 1pc 3) Rechargeable Lithium Polymer Battery Pack 5000mAH (P/N: 136-3890) ~ 1pc 4) Remote Control (P/N: 136-3887) ~ 1pc 5) AC to DC Power Adaptor (P/N: 112-3513 - Audiovox DT102A | Operation Manual - Page 5
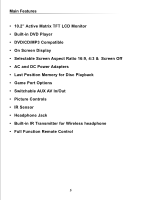
• 10.2" Active Matrix TFT LCD Monitor • Built-in DVD Player • DVD/CD/MP3 Compatible • On Screen Display • Selectable Screen Aspect Ratio 16:9, 4:3 & Screen Off • AC and DC Power Adapters • Last Position Memory for Disc Playback • Game Port Options • Switchable AUX AV In/Out • Picture Controls • IR - Audiovox DT102A | Operation Manual - Page 6
. 10. Stop - This button is used to stop playback. 11. Eject* - Press and hold for one second to Eject the Disc. 12. Infrared Transmitter and sensor - Used to transmit audio to the optional wireless Headphones. Also allows the remote control to operate the DT102. Note: The power and eject function - Audiovox DT102A | Operation Manual - Page 7
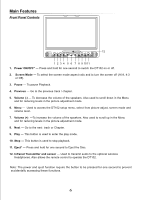
time. 5. 9V DC Input Jack - Used to connect power from either the supplied AC to DC adapter or the vehicle power adapter. Right Side Panel Controls and Connections 1 2 1. Rear DVD Disc Slot - for loading and removing discs. 2. Built-in Stand - for desktop use when the battery is not being used. 7 - Audiovox DT102A | Operation Manual - Page 8
Remote Control 26 1 25 2 24 3 4 5 23 6 VOL 22 7 21 8 9 10 20 11 19 12 13 18 14 17 15 16 1. Power - Turn the DT102 on and off. 2. Display - Display disc information (title, chapter, time, track, etc.) 3. Angle - Displays and selects the available camera angles. Each time you press - Audiovox DT102A | Operation Manual - Page 9
When purchased the remote control has a battery installed with a plastic insert to prevent battery discharge. Remove the plastic insert before attempting to use the remote. 21. Enter - Used to confirm a selected setting or option. 22. Setup - Allows the user to select the DVD player's setup options - Audiovox DT102A | Operation Manual - Page 10
Charging the Battery Pack The battery must be attached to the DVD player to charge it and the battery switch must be in the ON position. Plug the AC Power Adapter into the Player's DC-IN 9 V Jack, which is located on left side of the DT102. Plug the other end of the Power Cord into a wall Outlet. 10 - Audiovox DT102A | Operation Manual - Page 11
the button slide the battery pack from the DVD Player. NOTE: When attaching or detaching the battery pack, make sure to protect the LCD screen. Using the Home AC Adapter Plug the AC Power Adapter into the Player's DC-IN 9 V Jack, which is located on left side of the DT102. Plug the other end - Audiovox DT102A | Operation Manual - Page 12
Using the Vehicle DC Adapter To use the Vehicle DC Adapter disconnect the Battery pack and connect the supplied Vehicle Power Adapter into the DVD Player's Power Jack and the other end into the Vehicle power outlet as shown below. Vehicle DC 9V Power Outlet NOTE: Do not operate the unit or - Audiovox DT102A | Operation Manual - Page 13
1. Connect the DVD Player to the desired power Adapter or battery. 2. Press the "POWER" button for one second. 3. Load a disc with the label facing towards the front. Push the disc in about ¾ of the the way and the disc will be pulled into the Player automatically. 4. The disc will load and - Audiovox DT102A | Operation Manual - Page 14
12cm 600 min The disc maker specifies the operation of some DVD discs. Please refer to the instruction manual with the disc. Note: The DT102 is capable of playing most recordable DVDs in the DVD-R format. However due to the variety of recordable DVD disc manufacturers and software manufacturers - Audiovox DT102A | Operation Manual - Page 15
described below. Power Supply Connection Connect the AC power adapter to the side of the DVD player in the jack marked "DC 9V IN". Plug the twoprong end of the power cord to an AC100-240 outlet. If you have difficulty inserting the plug, turn it over and re-insert it. If the DVD Player will not be - Audiovox DT102A | Operation Manual - Page 16
DT102 Menu Adjustments Picture Adjustments When watching a program, the picture quality can be adjusted to suit your taste. MENU SET PICTURE MODE SELECT VOLUME EXIT PICTURE CONTRAST BRIGHTNESS COLOR TINT RESET EXIT 1. Press the MENU button on the front of the DVD player, the main menu will remote - Audiovox DT102A | Operation Manual - Page 17
. NOTE: The volume can also be controlled by using the volume +/- buttons on the DT102 or the remote control. Exit Use the +/- buttons to select EXIT, press the menu button to exit the menu. MENU SET PICTURE MODE SELECT VOLUME EXIT NOTE: The menu will also disappear from the screen automatically if - Audiovox DT102A | Operation Manual - Page 18
options that let you customize your DVD player. For example, you can select a language for the OSD (On Screen Display), limit playback by children, select the TV Type and aspect ratio. Using the Setup Menu 1) Press the setup button on the remote control. The Setup Menu will appear on the screen as - Audiovox DT102A | Operation Manual - Page 19
TV Type The TV The bands will vary, depending on the aspect ratio of the DVD. NOTE: This setting can only be made when there is no disc in player. Password Password" and input any new four digit password and press ENTER. Note: Record the new password in a location where you will not lose or forget - Audiovox DT102A | Operation Manual - Page 20
the value, the more strict the control. G PG PG - 13 R NC - 17 ADULT Note: This feature only works on DVD's that contain the rating lockout feature. only available for discs that are recorded in the above listed languages. If the selected, language is not available, the player will play and display - Audiovox DT102A | Operation Manual - Page 21
the remote control at the DVD Player. Make sure the battery is inserted correctly (check polarity). Replace weak battery. The words "Invalid Key" appear on screen The feature or action cannot be completed at this time because: The disc's software restricts it. The disc's software doesn't support - Audiovox DT102A | Operation Manual - Page 22
System : Audio Output : Video Output : 10.2" 800 RGB x 480 DVD, CD, MP3, CD-R, CD-RW, DVD-R TFT Active Matrix 780/650mm NTSC/PAL/AUTO Output Level: 1.5V±0.2/1.0, Load: 10K ohms Output Level: 1Vp-p±0.1, Load: 75ohms Unbalanced Negative Power Consumption : Power Supply : 1.2 Amps Average +9VDC 22 - Audiovox DT102A | Operation Manual - Page 23
workmanship within ninety (90) days from the date of original purchase, such defect(s) will be repaired or replaced with reconditioned product (at the Company's option) without charge for parts and repair labor. A game controller, if supplied, is similarly waranteed for ninety (90) days. To obtain
-
 1
1 -
 2
2 -
 3
3 -
 4
4 -
 5
5 -
 6
6 -
 7
7 -
8
-
9
-
10
-
11
-
12
-
13
-
14
-
15
-
16
-
17
-
18
-
19
-
20
-
21
-
22
-
23
 |
 |