Audiovox FPE1505DV Operation Manual - Page 25
Computer Screen Function
 |
UPC - 044476028250
View all Audiovox FPE1505DV manuals
Add to My Manuals
Save this manual to your list of manuals |
Page 25 highlights
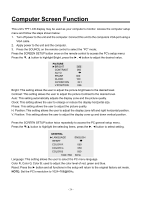
Computer Screen Function This unit's TFT LCD display may be used as your computer's monitor. Access the computer setup menu and follow the steps shown below: 1. Turn off power to the unit and the computer. Connect this unit to the computers VGA port using a VGA cable. 2. Apply power to the unit and the computer. 3. Press the SOURCE on the remote control to select the "PC" mode; Press the SCREEN SETUP button once on the remote control to access the PC's setup menu: Press the ▼, ▲ button to highlight Bright, press the ►, ◄ button to adjust the desired value. PICTURE ►BRIGHT CONTRAST AUTO PHASE CLOCK H.POSITION V.POSITION 050 060 000 100 041 036 Bright: This setting allows the user to adjust the picture brightness to the desired level. Contrast: This setting allows the user to adjust the picture Contrast to the desired level. Auto: This setting automatically adjusts the display zone and the picture quality. Clock: This setting allows the user to enlarge or reduce the display horizontal size. Phase: This setting allows the user to adjust the picture quality. H. Position: This setting allows the user to adjust the display zone left and right horizontal position. V. Position: This setting allows the user to adjust the display zone up and down vertical position. Press the SCREEN SETUP button twice repeatedly to access the PC general setup menu. Press the ▼/▲ button to highlight the selecting items, press the ►, ◄ button to select setting. GENERAL ►LANGUAGE RESET COLOR R COLOR G COLOR B 1024×768 ENGLISH 050 050 050 60Hz Language: This setting allows the user to select the PC menu language. Color R, Color G, Color B: used to adjust the color level of red, green and blue. Reset: Press the ► button and all functions in the setup will return to the original factory set mode. NOTE: Set the PC's resolution to 1024×768@60Hz. - 24 -
-
 1
1 -
2
-
3
-
4
-
5
-
6
-
7
-
8
-
9
-
10
-
11
-
12
-
13
-
14
-
15
-
16
-
17
-
18
-
19
-
 20
20 -
 21
21 -
 22
22 -
 23
23 -
 24
24 -
 25
25 -
 26
26 -
 27
27 -
 28
28 -
 29
29 -
 30
30 -
31
-
32
-
33
-
34
-
35
-
36
-
37
-
38
 |
 |
