Audiovox HD510 Operation Manual - Page 14
Installing your Surround Speakers
 |
UPC - 609635300617
View all Audiovox HD510 manuals
Add to My Manuals
Save this manual to your list of manuals |
Page 14 highlights
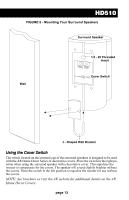
Installing your Surround Speakers The surround speakers are identical and can be used for any channel. Surround Speaker Placement Speaker placement is critical, and can make the difference between good and great sound quality. For optimum sound quality, position your front (main) surround speakers slightly in front of the video screen and turn them slightly inward (towards the center of the listening area). This reduces the possibility of reflection from the video screen or side walls. Turning the surround speakers farther inward produces a smaller sound stage and focuses the sound more directly to the listener's ear. Turning them less or not at all produces a larger sound stage and compromises localization of the sounds. Placing the left and right surround speakers closer to the front wall, side walls, or corners will increase the amount of audible bass. The HD510 surround speakers are designed to be placed within 18 inches of a wall for optimum tonal balance. Rear speakers should be placed approx at ear level or slightly higher. The center channel speaker should be placed above or below the television. Based on your listening preferences, you will want to experiment with the placement of your surround speakers. When possible, the surround speakers should be installed at the same level as the listener's ears. See "Surround System Configuration" on page 5 for more information on speaker placement. Connecting the Surround Speakers Strip approximately 3/8" of the insulation from the speaker wire, exposing the bare conductors. Twist each end of the speaker wire, and then connect the speakers in phase. Connect the positive (+) terminal from the Receiver to the positive (+) terminal on the speaker. Red typically indicates positive. Connect the negative (-) terminal from the Receiver to the negative (-) terminal on the speaker. Black is typically the color code for negative. Wall Mounting There are 2 mounting methods for the HD510 surround speakers. The first is using the ¼-20 threaded insert located on the back of the speaker. This is designed for use with after-market mounting hardware. See your local dealer for details. Another option is to use the "J" shaped wall brackets included with the system. Determine the placement for the speaker and mount the wall brackets securely to the wall. NOTE: Choose the appropriate mounting fasteners (not included) for your wall to ensure a secure and stable installation. NOTE: The rubber bump-ons can be used when the speakers will sit on a shelf. These bump-ons will raise the speaker slightly, allowing it to sit level when the wire management channel on the back of the speakers is used. page 12
-
 1
1 -
2
-
3
-
4
-
5
-
6
-
7
-
8
-
 9
9 -
 10
10 -
 11
11 -
 12
12 -
 13
13 -
 14
14 -
 15
15 -
 16
16 -
 17
17 -
 18
18 -
 19
19 -
20
-
21
-
22
-
23
-
24
-
25
-
26
-
27
-
28
-
29
-
30
-
31
-
32
-
33
-
34
-
35
-
36
-
37
-
38
-
39
-
40
-
41
-
42
-
43
-
44
-
45
-
46
-
47
-
48
-
49
-
50
-
51
 |
 |