Audiovox LCM45NB Installation Manual - Page 3
Illustration of Connections - lcd monitor
 |
UPC - 044476029561
View all Audiovox LCM45NB manuals
Add to My Manuals
Save this manual to your list of manuals |
Page 3 highlights
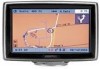
Preface This video monitor can display up to 3 different video inputs. The inputs are Navigation, Rear observation camera and Interior observation camera. INSTALLATION INSTRUCTIONS Screw holes for mounting bracket 1 T slot for mounting bracket 2 Figure 1. Backside of Monitor The monitor can be mounted by two different methods. • AMPS compatible mounting pattern for bracket or gooseneck • T-slot for Fan Bracket. Select the appropriate mounting location that is visible to the driver and does not obstruct the drivers view thru the windshield. 1. Installation using mounting bracket method. • Use the 4 screws to tighten the selected AMPS hole pattern bracket onto the back of the monitor display. • Attach the mounting bracket to the selected mounting location. 2. Installation using mounting T slots. • Slide the T-bolt into the T- slot on the back of monitor display. • Tighten the T-nut until snug with the T-slot on the back of the monitor. • Remove the protective plastic from the doubled sided tape on the fan bracket. Then place the fan bracket on the chosen location. 2 Illustration of Connections Cable Plug for Navigation Navigation Computer Connector LCD Monitor Connector Control Box Connector Connector Connector Filter Box Interior camera Rearview camera Fuse Red Black Blue Green Fused +12V Constant Ground/Shield Ignition +12V Source Reverse Switch Figure 4. System Connections 7
-
 1
1 -
 2
2 -
 3
3 -
 4
4 -
 5
5
 |
 |
