Audiovox LCM45NB Installation Manual - Page 5
Interior Camera, CONTROLS AND INDICATORS
 |
UPC - 044476029561
View all Audiovox LCM45NB manuals
Add to My Manuals
Save this manual to your list of manuals |
Page 5 highlights
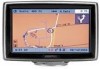
5. Video Inputs The video input connections for the system are as follows: a) Rear Camera (optional): Plug the camera RJ 11 cable end into the control box (AVin-1 location). Set the Cam Button selector switch on the control box to the AV-1 position. Route the camera cable to the rear camera and plug the 4-pin male connector into camera 4 pin female connector. The monitor will display the rearview camera image when the vehicle is shifted into reverse. b) Interior Camera (optional): Plug the camera RJ 11 cable end into the control box AVin-2. Set the Cam Button selector switch on the control box to the AV-2 position. The monitor will display the interior camera image when the camera button on the left side of the monitor is pressed and held c) Navigation (optional): Plug the Audiovox navigation monitor cable connector directly into the rear of the monitor. The navigation image will be displayed whenever the vehicle is turned on. 4 CONTROLS AND INDICATORS Figure 3. LCM45NB Monitor Controls and Indicators A: 4.5" TFT color LCD B: Speaker volume control: adjusts the rearview camera volume only when the vehicle is in reverse. C: LCD brightness control: adjusts the brightness of display. D: Camera switch (see below). E: Remote IR Sensor for Audiovox Navigation only. CAMERA SWITCH 1). When switch D is pressed and the vehicle is shifted into reverse gear: • No function 2). When switch D is pressed and vehicle is in any other gear: • Will display the interior camera image if the optional Interior camera is installed. • Will display the rearview camera image if only rearview camera is installed. • No function if the optional navigation is the only input. 5
-
 1
1 -
 2
2 -
 3
3 -
 4
4 -
 5
5
 |
 |
