Autodesk 62204-541108-9310 Administration Guide - Page 13
Create a Network Share, To extract a Microsoft Installer Patch MSP file from a service pack
 |
UPC - 606121703686
View all Autodesk 62204-541108-9310 manuals
Add to My Manuals
Save this manual to your list of manuals |
Page 13 highlights
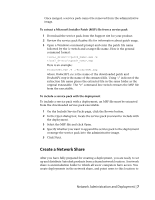
Once merged, a service pack cannot be removed from the administrative image. To extract a Microsoft Installer Patch (MSP) file from a service pack 1 Download the service pack from the Support site for your product. 2 Review the service pack Readme file for information about patch usage. 3 Open a Windows command prompt and enter the patch file name followed by the /e switch and a target file name. Here is the general command format: \.exe /e \.msp Here is an example: ProductSP1.exe /e ./ProductSP1.msp where ProductSP1.exe is the name of the downloaded patch and ProductSP1.msp is the name of the extracted file. Using './' in front of the extraction file name places the extracted file in the same folder as the original executable. The "e" command line switch extracts the MSP file from the executable. To include a service pack with the deployment To include a service pack with a deployment, an MSP file must be extracted from the downloaded service pack executable. 1 On the Include Service Packs page, click the Browse button. 2 In the Open dialog box, locate the service pack you want to include with the deployment. 3 Select the MSP file and click Open. 4 Specify whether you want to append the service pack to the deployment or merge the service pack into the administrative image. 5 Click Next. Create a Network Share After you have fully prepared for creating a deployment, you are ready to set up and distribute Autodesk products from a shared network location. A network share is an installation folder to which all users' computers have access. You create deployments in the network share, and point users to this location to Network Administration and Deployment | 7
-
 1
1 -
2
-
3
-
4
-
5
-
6
-
7
-
 8
8 -
 9
9 -
 10
10 -
 11
11 -
 12
12 -
 13
13 -
 14
14 -
 15
15 -
 16
16 -
 17
17 -
 18
18 -
19
-
20
-
21
-
22
-
23
-
24
-
25
-
26
-
27
-
28
-
29
-
30
-
31
-
32
-
33
-
34
-
35
-
36
-
37
-
38
-
39
-
40
-
41
-
42
-
43
-
44
 |
 |
