Avanti DER24P3S Instruction Guide - Page 17
the surface temperature of the glass cooktop returns to a safe temperature.
 |
View all Avanti DER24P3S manuals
Add to My Manuals
Save this manual to your list of manuals |
Page 17 highlights
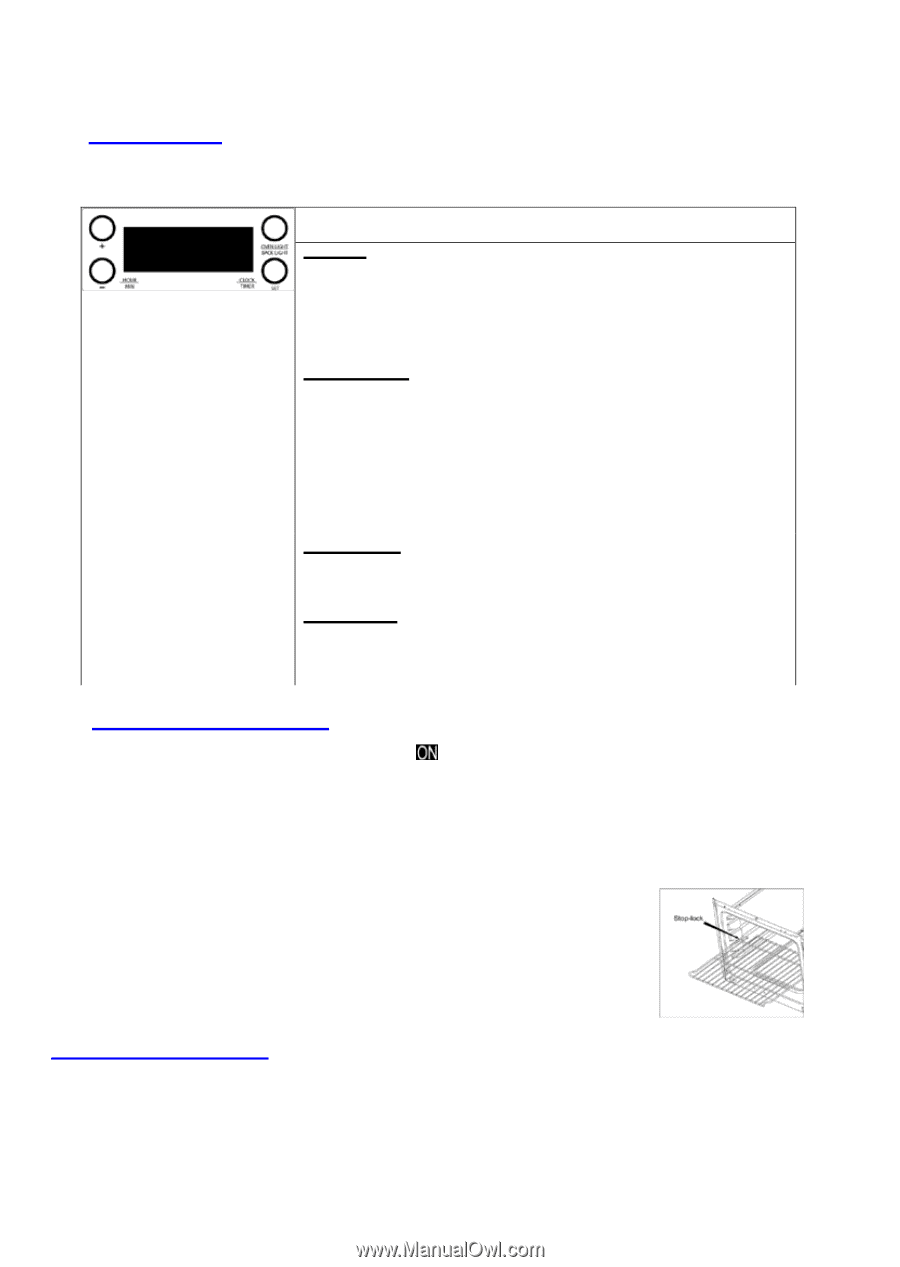
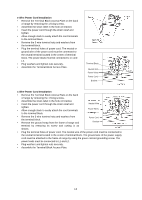
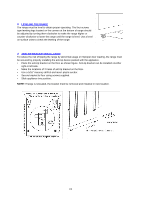
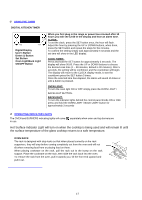
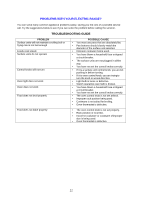
Ø USING THE TIMER DIGITAL KITCHEN TIMER Digital Display Up (+) Button Down (-) Button Set Button Oven Light/Back Light ON/OFF Button When you first plug in the range or power has returned after 10 hours you will see 12:00 in the display and hear an alarm tone. CLOCK: To set the clock, press the SET button once, the hour will flash. Adjust the hour by pressing the UP or DOWN buttons, when done, press the SET button and repeat the steps for the minutes. To confirm the setting simply wait approximately 5 seconds and the set time will show in the LED display. COOK TIMER: Press and hold the SET button for approximately 3 seconds. The display will show 00:00. Press the UP or DOWN buttons to choose the desired cook time (1 - 99 minutes, default is 00 minutes). After 5 seconds, the setting will be confirmed, and the countdown will begin. The display will return to the CLOCK display mode, to see the countdown press the SET button 3 times. Once the selected time has elapsed, the alarm will sound 15 times or until a button is pressed. OVEN LIGHT: To turn the oven light ON or OFF simply press the OVEN LIGHT / BACKLIGHT BUTTON. BACKLIGHT: To turn the indicator lights behind the control panel knobs ON or OFF press and hold the OVEN LIGHT / BACK LIGHT button for approximately 3 seconds Ø OPERATING INDICATOR LIGHTS The OVEN and BURNERS indicating lights will come in use. separately when oven and top burners are Hot Surface Indicator Light will turn on when the cooktop is being used and will remain lit until the surface temperature of the glass cooktop returns to a safe temperature. OVEN RACK The rack is designed with stop-locks so that when placed correctly on the rack supporters, they will stop before coming completely out from the oven and will not tilt when removing food from or placing food on them. When placing cookware on the rack, pull the rack out to the bump on the rack support. Place the cookware on the rack, then slide the rack back into the oven. To remove the rack from the oven, pull it towards you, tilt the front end upward and pull it out. 17
-
 1
1 -
2
-
3
-
4
-
5
-
6
-
7
-
8
-
9
-
10
-
11
-
 12
12 -
 13
13 -
 14
14 -
 15
15 -
 16
16 -
 17
17 -
 18
18 -
 19
19 -
 20
20 -
 21
21 -
 22
22 -
23
-
24
-
25
-
26
-
27
-
28
-
29
-
30
-
31
-
32
-
33
-
34
-
35
-
36
-
37
-
38
-
39
-
40
-
41
-
42
-
43
-
44
-
45
-
46
-
47
-
48
-
49
-
50
-
51
-
52
-
53
-
54
-
55
-
56
-
57
-
58
-
59
-
60
 |
 |