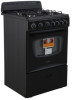
Avanti GR2415CB Instruction Manual - Page 9
Cook time Indicator, Set Button
 |
View all Avanti GR2415CB manuals
Add to My Manuals
Save this manual to your list of manuals |
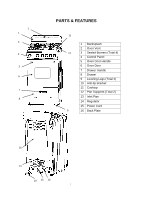
Page 9 highlights
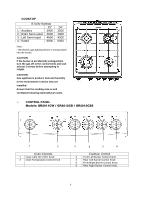
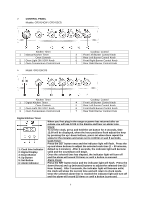
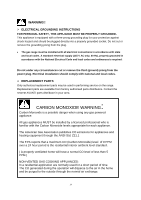
CONTROL PANEL Models: GR2414CW / GR2415CB Kitchen Timer 1 Manual Kitchen Timer Oven Controls 2 Oven Light ON / OFF Knob 3 Oven Temperature Control Knob Model: GR2416CSS Cooktop Control 4 Front Left Burner Control Knob 5 Rear Left Burner Control Knob 6 Front Right Burner Control Knob 7 Rear Right Burner Control Knob Kitchen Timer 1 Digital Kitchen Timer Oven Controls 2 Oven Light ON / OFF Knob 3 Oven Temperature Control Knob Cooktop Control 4 Front Left Burner Control Knob 5 Rear Left Burner Control Knob 6 Front Right Burner Control Knob 7 Rear Right Burner Control Knob Digital Kitchen Timer 1: Cook time Indicator 2: Digital Display 3: Down Button 4: Up Button 5: Set Button 6: Alarm Indicator When you first plug in the range or power has returned after an outage you will see 12:00 in the display and hear an alarm tone. Clock: To set the clock, press and hold the set button for 3 seconds, time 12:00 will be displayed, when the hour positions flash adjust the hour by pressing the up / down buttons, press set when done repeat the steps for the minutes and press set to confirm or wait 5 seconds. Cook Timer: Press the SET button once and the indicator light will flash. Press the up and down buttons to adjust the selected cook-time (1 - 99 minutes, default is 3 minutes). After 5 seconds, the indicator light will become solid and the countdown will begin. Once the selected time has elapsed, the indicator light will turn off and the alarm will sound 15 times or until a button is pressed. Alarm Clock: Press the SET button twice and the indicator light will flash. Press the down (Hours) and up (minutes) buttons to adjust the selected time (12 Hour format). After 5 seconds, the indicator light will become solid, the clock will show the current time and will return to clock mode. Once the selected alarm time is reached the indicator light will turn off and the alarm will sound 15 times or until a button is pressed. 9
-
 1
1 -
2
-
3
-
 4
4 -
 5
5 -
 6
6 -
 7
7 -
 8
8 -
 9
9 -
 10
10 -
 11
11 -
 12
12 -
 13
13 -
 14
14 -
15
-
16
-
17
-
18
-
19
-
20
-
21
-
22
-
23
-
24
-
25
-
26
-
27
-
28
-
29
-
30
-
31
-
32
-
33
-
34
-
35
-
36
-
37
-
38
-
39
-
40
-
41
-
42
-
43
-
44
-
45
-
46
-
47
-
48
-
49
-
50
-
51
-
52
 |
 |
