Behringer B-CONTROL DEEJAY BCD2000 Manual - Page 9
Phones Split/master Out - windows 8
 |
View all Behringer B-CONTROL DEEJAY BCD2000 manuals
Add to My Manuals
Save this manual to your list of manuals |
Page 9 highlights
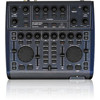
B-CONTROL DEEJAY BCD2000 The PFL MIX control determines the headphone volume ratio between deck A and deck B. Both signals can be heard in both earcups (stereo). When the PHONES SPLIT button is pressed, it controls the volume ratio between the signals of deck A in the left and deck B in the right earcup. PHONES SPLIT/MASTER OUT button. In the position PHONES SPLIT (press button briefly) the signals of both decks are separated in the headphones. In this case, they will be audible in mono in each earphone. In the position MASTER OUT (keep button pressed until button LED starts flashing), the same signal is applied to the headphones output and the master outputs. This allows you to control your crossfader skills, for example, when practicing at home or when there is nothing connected to the master outputs. Set the volume of the MASTER output MASTER OUTPUT control. with the The POWER ON-LED lights up when the BCD2000 is switched on. The deck sections A and B The control elements of decks A and B are the same. However, some of them are grouped the opposite way round. We will therefore describe the elements to only once. All of these control elements refer to the software functions which can be “remotely” controlled from the BCD2000. The crossfader is used to fade between deck A and deck B. BEND button. Press the UP button (+) to raise the playback tempo. Press the DOWN button (–) to slow down the playback tempo. With this function you can synchronize the beats of two pieces currently running. In the Configuration window of the B-DJ software you can adjust the percentage by which the tempo is changed. The pitch fader provides continuously adjustable playback tempo control. The pitch range can be adjusted in the Configuration menu. Use the SEARCH buttons to move forward or backward in a song. The function performed by the scratch wheel depends on whether the deck is in PLAY or PAUSE mode. PLAY: pitch bend is active. This function mimics the “pitching” technique (accelerating and slowing down the turntable to adapt the rhythm of two vinyl records to each other). Turn the scratch wheel clockwise to raise the playback tempo. Turn it counter-clockwise to slow down the tempo. However, if the SCRATCH button is pressed, you can also scratch during playback. PAUSE: Cue Search is active: You can both scratch and locate exact cue positions. 3.2 The rear panel Use the GAIN control to adjust the input signal. Each deck features a 3-band equalizer (HI, MID and LOW) with kill feature. Thus, the signal can be attenuated to a much greater extent (-36 dB) than it can be raised (+12 dB). The CUT buttons below the EQ controls give you maximum signal attenuation at the touch of a button. In this way, you can fade out a specific frequency range of a music piece completely and produce interesting filter effects. For beat juggling, too, this function is a must. When you press the BACK TO TOP button, the song position pointer is set back to the beginning of the piece. Playback stops even though the deck has just played! LOOP IN/END determines the start and end points of a sequence to be played back several times in a loop. Press the button to set the loop start point, and then again to set the end point. Once the end point has been set, the loop starts, i. e. the sequence is played back from the start point and is repeated until you press the LOOP OUT button. LOOP OUT deactivates the loop which was started with button . Depending on the setting chosen in the software configuration, the loop is either deleted directly or repeated one more time. SYNC SLAVE is a function which allows you to automatically adapt the tempo of two music pieces to each other. The song whose SYNC SLAVE button is pressed, is automatically adapted to meet the tempo of the song currently playing. The scratch function is usually active only when the deck is in pause mode. The SCRATCH button activates the scratch function of the scratch wheel also during playback (PLAY button pressed). Fig. 3.2: The rear-panel audio connectors of the BCD2000 MIC INPUT. The MIC IN connector is the balanced XLR input for your dynamic microphone. The analog input A (PHONO) is used for connecting a turntable. Connect the ground cable on your turntable to the GND screw on the BCD2000 housing. Analog input B. To connect a CD player or tape deck to this input, set the switch to LINE. Connect the MASTER OUTPUT to your power amplifier. It provides the main output signal, which can be adjusted with the MASTER control . SERIAL NUMBER. With the VOLUME fader, you can control the volume. While mixing, it is important to have the same volume in both decks. Use the CUE button to set and select the cue points. Press the CUE button a little longer to delete the currently selected CUE point. How to use the CUE function is described in chapter 5.2. Playback is started with the PLAY/PAUSE button. Press this button again to stop playback. Press the button once again to resume playback from the position where it stopped. 3. CONTROL ELEMENTS AND CONNECTIONS 9
-
 1
1 -
2
-
3
-
 4
4 -
 5
5 -
 6
6 -
 7
7 -
 8
8 -
 9
9 -
 10
10 -
 11
11 -
 12
12 -
 13
13 -
 14
14 -
15
-
16
-
17
 |
 |
