Behringer RX1202FX Manual - Page 8
Main - pro
 |
View all Behringer RX1202FX manuals
Add to My Manuals
Save this manual to your list of manuals |
Page 8 highlights
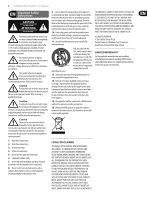
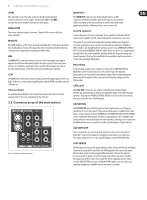
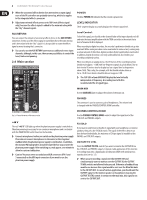
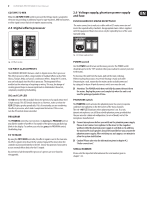
8 EURORACK PRO RX1202FX User Manual ◊ When the connected effects device does not receive an input signal, none of the FX controllers are probably turned up, which also applies to the integrated effects -processor. ◊ Adjust your external effects processor to 100% wet (effects signal only), because the effects signal is added to the main mix along with the "dry" channel signals. AUX RETURN You can connect the outputs of an external effects device to the AUX RETURN connectors. In this case, the effects signal is routed directly to the main mix bus and is then mixed with the "dry" signal. It is also possible to route the effects signal as mono by using the L connector. ◊ You can also use the AUX RETURN connectors as additional stereo input channels, although, in this case, there are no possibilities to control the level, timbre and panning. 2.4 Main section POWER The blue POWER LED indicates that the console is powered on. LEVEL INDICATOR The 4-segment display accurately displays the relevant signal level. Level Control: To level the signal, you should set the channel fader of the input channels to 0 dB and raise the input amplification with the TRIM controller to the extent that a level of maximal 0 dB is displayed. When recording to digital recorders, the recorder's peak meter should not go into overload. While analog recorders can be overloaded to some extent, creating only a certain amount of distortion, digital recorders distort quickly when overloaded. In addition, digital distortion is not only undesirable, but also renders your recording completely useless. When recording to an analog device, the VU meters of the recording machine should reach approx. +3 dB with low-frequency signals (e.g. kick drum). Due to their inertia VU meters tend to display too low a signal level at frequencies above 1 kHz. This is why, for example, a Hi-Hat should only be driven as far as -10 dB. Snare drums should be driven to approx. 0 dB. ◊ The CLIP LEDs of your EURORACK display the level virtually independent of frequency. A recording level of 0 dB is recommended for all signal types. MAIN MIX Use the MAIN MIX fader to adjust the volume of the main out. PHONES The connector is used to connect a pair of headphones. The volume level is changed with the PHONES/CONTROL ROOM controller. Fig. 2.4: Control elements of the main section +48 V The red "+48 V"-LED lights up when the phantom power supply is switched on. Phantom powering is necessary to use condenser microphones and is activated with the PHANTOM ON switch found on the backside. ◊ Connect microphones before you switch on the phantom power supply. Please do not connect microphones to the mixer (or the stagebox/ wallbox) while the phantom power supply is switched on. In addition, the monitor/PA loudspeakers should be muted before you activate the phantom power supply. After switching on, wait approx. one minute to allow for system stabilization. ◊ Caution! You must never use unbalanced XLR connectors (PIN 1 and 3 connected) on the MIC input connectors if you want to use the phantom power supply. PHONES/CONTROL ROOM Use the PHONES/CONTROL ROOM control to adjust the signal level of the CTRL OUT and PHONES outputs. FX SOLO If you want to only listen to the effects signal with your headphones or monitor speakers, then press the FX SOLO switch. The signal of the effects device can then be heard individually; the main mix or CD/tape signal is inaudible at the PHONES and CTRL OUT outputs. CD/TAPE TO CTRL Press the CD/TAPE TO CTRL switch if you want to monitor the CD/TAPE IN via the CTRL OUT and PHONES outputs. A typical studio application of this function is recording music into a digital audio workstation (DAW) with simultaneous reproduction (see ch. 3.1). ◊ When you are recording a signal over the CD/TAPE OUT and simultaneously want to monitor over the CD/TAPE IN, the CD/TAPE TO MIX switch is not allowed to be pressed. Otherwise a feedback loop would occur because this signal would be sent over the Main Mix back to the CD/TAPE OUT. In case of such an application, you should send the CD/TAPE signal to the monitor speakers or headphones by using the CD/TAPE TO CTRL switch. In contrast to the main mix, this signal is not sent to the CD/TAPE OUT.
-
 1
1 -
2
-
 3
3 -
 4
4 -
 5
5 -
 6
6 -
 7
7 -
 8
8 -
 9
9 -
 10
10 -
 11
11 -
 12
12 -
 13
13 -
14
-
15
-
16
 |
 |