Behringer UCA222 Manual - Page 7
Software Installation, 5. Basic Operation, OUTPUT, INPUT, OFF/ON MONITOR, USB CABLE - setup
 |
View all Behringer UCA222 manuals
Add to My Manuals
Save this manual to your list of manuals |
Page 7 highlights
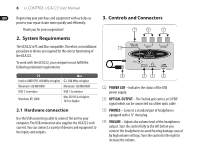
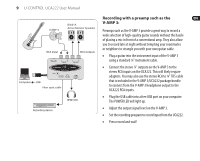
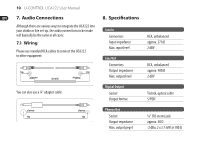
7 U-CONTROL UCA222 User Manual (5) OUTPUT - Connect to a speaker system using stereo RCA cables to monitor the audio output from the computer. (6) INPUT - Connect desired recording signal using audio cables with RCA connectors. (7) OFF/ON MONITOR - With the MONITOR switch OFF, the headphone output receives the signal from the computer over the USB port (same as the RCA output jacks). With the MONITOR switch ON, the headphones receive the signal connected to the RCA INPUT jacks. (8) USB CABLE - Sends information to and from your computer and the UCA222. It also provides power to the device. 4. Software Installation • This device requires no special setup or drivers, just plug it into a free USB port on a PC or Mac. • The UCA222 comes with a free version of Audacity editing software. This will help make the transfer process quick and simple. Simply insert the CD into your CD-ROM drive and install the software. The CD also contains VST plug-ins, ASIO drivers and various freeware. ◊ Note - When the UCA222 is bundled with other BEHRINGER products, the included software may vary. In the instance that the ASIO drivers are not included, you may download these from our website at behringer.com. 5. Basic Operation The UCA222 provides an easy interface between your computer, mixer and monitoring system. Follow these steps for basic operation: 1) Connect the UCA222 to the computer by plugging the USB cable into a free USB port. The power LED will light automatically. 2) Connect the audio source that is to be recorded, such as a mixer, preamp, etc. to the INPUT stereo RCA jacks. 3) Plug a pair of headphones into the 1/8" PHONES jack and adjust the volume with the adjacent control. You may also monitor the output by plugging a pair of powered speakers into the OUTPUT stereo RCA jacks. 4) You may also send the stereo signal in digital audio format (S/PDIF) to an external recording device via the OPTICAL OUTPUT using a Toslink fiber optic cable.
-
 1
1 -
 2
2 -
 3
3 -
 4
4 -
 5
5 -
 6
6 -
 7
7 -
 8
8 -
 9
9 -
 10
10 -
 11
11 -
 12
12 -
13
 |
 |