Behringer ULTRAGAIN PRO-8 DIGITAL ADA8000 Manual - Page 5
Applications, Audio Connections - interface
 |
View all Behringer ULTRAGAIN PRO-8 DIGITAL ADA8000 manuals
Add to My Manuals
Save this manual to your list of manuals |
Page 5 highlights
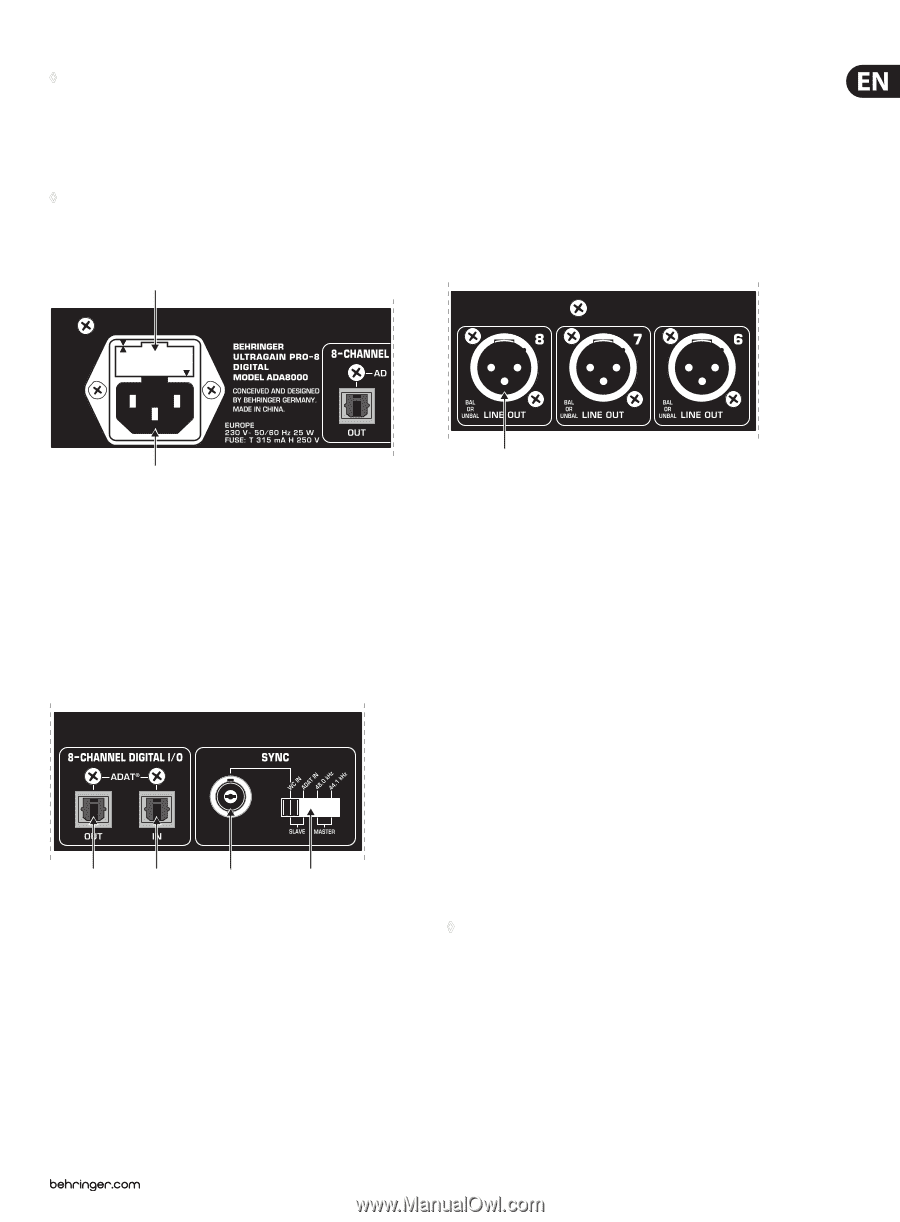
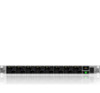
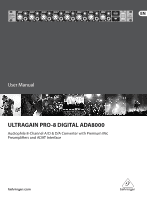
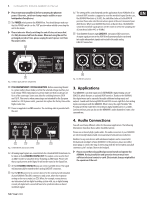
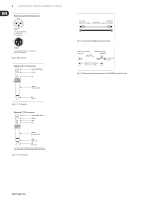
5 ULTRAGAIN PRO-8 DIGITAL ADA8000 User Manual ◊ Please mute your amplifier(s) before activating the phantom power. Otherwise, switch-on thumps may be audible on your loudspeakers/headphones. (9) The POWER switch powers the ADA8000 on. You should always make sure that the POWER switch is in the "Off" position when initially connecting the unit to the mains. ◊ Please take note: Merely switching the unit off does not mean that it is fully disconnected from the mains. When not using the unit for prolonged periods of time, please unplug the unit's power cord from the power outlet. (10) (15) The setting of this switch depends on the application of your ADA8000. If an external ADAT recorder is supposed to send the wordclock signal (in this case, the ADA8000 functions as SLAVE), the switch has to be set to the ADAT IN position. Please also note the instructions given in the user's manual of your ADAT device. When your ADA8000 functions as Master (here, the ADA8000 sends the wordclock signal) please use the switch to select the sampling rate of your choice (either 44,1 or 48 kHz). (16) Your ADA8000 features eight LINE OUTs on balanced XLR connectors. An input signal present at the ADAT IN will automatically be transferred into eight independent signals and routed to the eight analog LINE OUT connectors. (11) Fig. 2.2: Mains supply and fuse compartment (16) Fig. 2.4: LINE OUT connectors (10) FUSE COMPARTMENT / VOLTAGE SELECTION. Before connecting the unit to a power outlet, please make sure that the selected voltage matches your local voltage. When replacing fuses, please make sure that you always use fuses of the same type. Some units allow for switching between 230 V und 120 V. Please note: when connecting a unit intended for the European market to a 120 V power outlet, you must also replace the factory fuse with a higher-value fuse. (11) Power is supplied via an IEC connector. The matching cable is provided with the unit. 3. Applications Your ADA8000 is an ideal expansion for BEHRINGER's digital mixing console DDX3216, which features an optional ADAT interface. Thanks to the ADA8000, this digital mixer can be expanded by eight additional analog inputs and outputs. Sound cards featuring ADAT INs and OUTs receive eight first-class analog inputs and outputs with the ADA8000. What's more, the eight "Invisible" Mic Preamps perfectly enable direct recording to digital multitrackers (e.g. ADAT). Last but not least, you can also use the ADA8000's audio channels to create a live surround mix. 4. Audio Connections You will need many different cables for the various applications. The following illustrations show how these cables should be laid out. Please use exclusively high-grade cables. The audio connectors of your ADA8000 are electronically balanced and ensure automatic hum and noise reduction. (12) (13) (14) (15) Fig. 2.3: ADAT IN/OUT and wordclock SYNC Needless to say, even devices with unbalanced outputs can be connected to the balanced in/outputs of your ADA8000. For this purpose, please use either mono plugs or connect the ring of stereo plugs with the sleeve (when using XLR connectors, pin 1 and pin 3 have to be bridged). (12) All analog input signals are converted into the standard ADAT format and can be taken at the 8-CHANNEL DIGITAL OUT. This output can be used to feed an ADAT recorder or any other device featuring an ADAT input. Please note that a signal present at the Digital In will not be routed to the Digital Out. ◊ Please ensure that only qualified personnel install and operate the ADA8000. During installation and operation the user must have sufficient electrical contact to earth. Electrostatic charges might affect the operation of the unit. (13) At the 8-CHANNEL DIGITAL IN, you can connect an ADAT device. The signal will automatically be routed to the 8 analog LINE OUT connectors. (14) Use the WC IN connector to connect devices for the external synchronization of your ADA8000. This BNC connector is only active, when the respective setting on the rear is made (see (15)). When, for example, various devices are interconnected in a digital recording system with, say, a digital mixing console, all digital units connected have to be synchronized via a shared wordclock signal.
-
 1
1 -
 2
2 -
 3
3 -
 4
4 -
 5
5 -
 6
6 -
 7
7 -
 8
8 -
 9
9
 |
 |