Behringer VMX1000USB Manual - Page 4
Control Elements - pro mixer
 |
View all Behringer VMX1000USB manuals
Add to My Manuals
Save this manual to your list of manuals |
Page 4 highlights
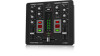
ENGLISH 4 2. Control Elements PRO MIXER VMX1000USB User Manual Fig. 2.1 Front view of the PRO MIXER VMX1000USB 2.1 Microphone channels [1] These are the balanced XLR connectors for dynamic microphones. [2] Using the 3-band microphone equalizer (HIGH, MID and LOW), you can change the sound of your voice and optimally adjust it (+/-15 dB). [3] The AUX control adjusts the volume of the MIC AUX send signal laid out at the rear panel MIC AUX SEND connector (see {38}). [4] Use the VOL control to adjust the microphone signal volume. Your PRO MIXER features a talk over function. It works very simply: as soon as you talk into your mike while a track is playing, the track's volume is lowered. When talking to the audience, this function is useful because it makes your voice come through over the music. [5] Use the tALK key to activate the talk over function (its LED is lit). [6] The SENS control changes the sensitivity of the talk over function. The lower it is set, the louder does the mike signal need to be in order to suppress the music signal. [7] Use the DPt control to determine the extent to which the music signal is lowered. [8] Use the MIc ON switch to activate the microphone channel. If its LED is lit, the channel is active. 2.2 Stereo channels [9] Select the input signal for the stereo channels using the INPUt key. "Phono" is intended for connecting a turntable. "Line" and "CD" have to be selected for all other signal sources (e. g. CD or MD players). Unlike the first three channels, channels 4 and 5 each feature two line inputs. On the rear panel, a special feature lets you change the input sensitivity of the phono inputs of channels 1 through 3 to line level, so that you get more flexibility (see {36}). Audio sent from a computer to the VMX via USB cable is routed to channel 1. This signal is mixed with the LINE input.
-
 1
1 -
 2
2 -
 3
3 -
 4
4 -
 5
5 -
 6
6 -
 7
7 -
 8
8 -
 9
9 -
 10
10 -
11
-
12
-
13
 |
 |
