Behringer VMX1000USB Manual - Page 5
MAIN OUT HEADPHONE XPQ 3D surround function, Effects loop - case
 |
View all Behringer VMX1000USB manuals
Add to My Manuals
Save this manual to your list of manuals |
Page 5 highlights
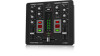
PRO MIXER VMX1000USB User Manual 5 ENGLISH ◊ Never connect equipment with line level signals to the highly sensitive phono inputs! The output signal level of turntables is on the order of magnitude of milivolts, while CD players and tape decks have signal levels measuring in volts. Simply put, line signals are up to 100 times stronger than those intended for phono inputs. If you're using phono inputs that can be switched into line level (see {36}), always make sure that the PHONO/LINE switch is in its correct position (switch pressed!). [10] The GAIN control is used to set the level of the input signal. The display {13}reads off the current signal level. [11] Every input channel features a 3-band equalizer (HIGH, MID and LOW) with kill characteristic. This way, a signal can be lowered (-32 dB) much more than it can be increased (+12 dB). for example, this function is useful when you need to suppress a particular frequency range in a music track. ◊ The overall signal level is also dependent on the EQ settings. You should first adjust the EQ before adjusting the signal level. [12] By using the EQ BYPASS key, you can deactivate the 3-band equalizer. This way, you can easily compare the processed and the unprocessed signals with one another; or, you can alternate between extreme EQ settings and the "raw" signal, creating cool effects. [13] You can read off the level of input signals (post EQ) using the 4-digit LEVEL meter. [14] Determine the channel volume using the 60-MM cHANNEL fader. [15] Pressing the PFL key routes the respective input so that it can be monitored on the headphones (corresponding LED is lit). You can also dial up several channels and listen to them simultaneously (see also chapter 2.4 "HEADPHONE section"). 2.3 MAIN OUT section [16] The VOL 1 control is used to adjust the output volume on the MAIN 1 output (see {41}). [17] The VOL 2 control is used to adjust the output volume on the MAIN 2 output (see {46}). [18] To adjust balance on the MAIN 1 output, use the BAL 1 control. [19] You can read off the MAIN 1 audio signal volume level on the LEVEL MEtEr. [20] The POWEr switch powers the PRO MIXER on. You should always make sure that the POWER switch is in the"Off" position when initially connecting the unit to the mains. ◊ Please take note: Merely switching the unit off does not mean that it is fully disconnected from the mains. When not using the unit for prolonged periods of time, please unplug the unit's power cord from the power outlet. ◊ Always turn the power amps on last to avoid inrush currents that can easily damage your speakers. And, to avoid sudden and unpleasant surprises for your ears, make sure there is no signal at the PRO MIXER before turning on the power amps. To be sure, slide all the faders to the bottom and switch all controls to the zero position. 2.4 HEADPHONE section The PfL signal is your headphone signal used to monitor music without influencing the MAIN signal (PfL = Pre fader Listening). [21] This is the unbalanced PHONES connector for your headphones. Your headphones should have a minimum impedance of 32 Ohms. for example, the BEHRINGER HPX2000 headphones are ideally suited for this purpose. [22] If the MODE switch is in the"SPLIT"position, the PfL signal is on the left, and the MAIN signal is on the right. The MIX control (see {23}) has no function in this case. While in "STEREO" mode, you can alternate between MAIN and PfL signals using the MIX control. [23] When in "STEREO" mode, use the MIX control to determine which signal is heard on the headphones. When MIX is in its left-most position (PFL), you can only hear the headphone signal selected previously using the PfL keys of the input channels (see {15}). When MIX is in its right-most position (MAIN), you can only hear the MAIN audio signal. Placing the MIX control somewhere in between those two extreme positions determines the volume ratio of the two signals. If the MODE switch is in its"SPLIT"position (see {22}), the (PfL) MIX control has no function. [24] The VOL control determines the volume of the headphone signal. 2.5 XPQ 3D surround function The XPQ 3D surround function is a built-in effect that gives your music a nice finishing touch, making every performance truly memorable. By widening the stereo base, the sound comes through more alive and transparent. Using the XPQ ON switch {25} activates the XPQ 3D surround function (corresponding LED is lit) and the XPQ control {26} determines the intensity of the effect. 2.6 Effects loop [27] Using the rEt control, you determine the volume of the effects signal that can be brought in at the RETURN input on the rear (see {49}). To get the effects signal, you need to connect the inputs of an effects unit to the SEND outputs (see {48}) of your VMX1000USB. The outputs of the effects unit are then connected to the RETURN inputs of your mixer.
-
 1
1 -
 2
2 -
 3
3 -
 4
4 -
 5
5 -
 6
6 -
 7
7 -
 8
8 -
 9
9 -
 10
10 -
 11
11 -
12
-
13
 |
 |
