Belkin F1DN108U User Manual - Page 15
Bracket Installation F1DN102U and F1DN104U
 |
UPC - 722868600825
View all Belkin F1DN108U manuals
Add to My Manuals
Save this manual to your list of manuals |
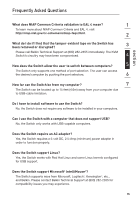
Page 15 highlights
Installation Bracket Installation (F1DN102U and F1DN104U) The 2- and 4-Port Switches can be installed into a 19-inch rack using an optional Rack-Mount Kit, sold separately (Belkin part number F1D005). 1.1 Attach the Rack-Mount Bracket to the Switch using the Phillips screws provided. (Refer to diagram below.) 1.2 Mount the Switch to the rack rails. (Refer to diagram below.) Your Switch is now mounted securely to the rack and you are ready to connect your console. 10
-
 1
1 -
2
-
3
-
4
-
5
-
6
-
7
-
8
-
9
-
 10
10 -
 11
11 -
 12
12 -
 13
13 -
 14
14 -
 15
15 -
 16
16 -
 17
17 -
 18
18 -
 19
19 -
 20
20 -
21
-
22
-
23
-
24
-
25
-
26
 |
 |

10
10
10
Installation
Bracket Installation (F1DN102U and F1DN104U)
The 2- and 4-Port Switches can be installed into a 19-inch rack using an optional
Rack-Mount Kit, sold separately (Belkin part number F1D005).
1.1
Attach the Rack-Mount Bracket to the Switch using the Phillips screws
provided. (Refer to diagram below.)
1.2
Mount the Switch to the rack rails. (Refer to diagram below.)
Your Switch is now mounted securely to the rack and you are ready to
connect your console.