Belkin F5D72314 User Manual - Page 113
assign you the IP address, subnet mask, and gateway address.
 |
UPC - 722868511244
View all Belkin F5D72314 manuals
Add to My Manuals
Save this manual to your list of manuals |
Page 113 highlights
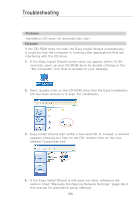
Troubleshooting 1 2. Unplug the Cable or DSL modem from its power source for 3 minutes. After 3 minutes plug the modem back into its power source. This may force the modem to properly recognize 2 the router. 3. Unplug the power to your Router, wait 10 seconds, and then 3 reconnect the power. This will cause the router to re-attempt communication with the modem. 4 If the "WAN" light on the Router is not lit after completing these steps, please contact Belkin Technical Support. 4. Try shutting down and restarting your computer. 5 6 Problem: • The Easy Install Wizard completed installation, but my web browser doesn't work 7 • I am unable to connect to the Internet. The Routers "WAN" light on my Router is on, and the "Connected" light is blinking 8 Solution: 9 If you cannot connect to the Internet, the "WAN" light is on, and the "Connected" light is blinking, the problem may be that your 10 connection type may not match the ISP's connection. 11 • If you have a "static IP address" connection, your ISP must assign you the IP address, subnet mask, and gateway address. 12 Please refer to the section entitled "Alternate Setup Method" for details on changing this setting. • If you have a "PPPoE" connection, your ISP will assign you a user name and password and sometimes a service name. Make sure the Router connection type is configured to PPPoE and the settings are entered properly. Please refer to your Router's User Guide section entitled "Alternate Setup Method" for details on changing this setting. section 111
-
 1
1 -
2
-
3
-
4
-
5
-
6
-
7
-
8
-
9
-
10
-
11
-
12
-
13
-
14
-
15
-
16
-
17
-
18
-
19
-
20
-
21
-
22
-
23
-
24
-
25
-
26
-
27
-
28
-
29
-
30
-
31
-
32
-
33
-
34
-
35
-
36
-
37
-
38
-
39
-
40
-
41
-
42
-
43
-
44
-
45
-
46
-
47
-
48
-
49
-
50
-
51
-
52
-
53
-
54
-
55
-
56
-
57
-
58
-
59
-
60
-
61
-
62
-
63
-
64
-
65
-
66
-
67
-
68
-
69
-
70
-
71
-
72
-
73
-
74
-
75
-
76
-
77
-
78
-
79
-
80
-
81
-
82
-
83
-
84
-
85
-
86
-
87
-
88
-
89
-
90
-
91
-
92
-
93
-
94
-
95
-
96
-
97
-
98
-
99
-
100
-
101
-
102
-
103
-
104
-
105
-
106
-
107
-
 108
108 -
 109
109 -
 110
110 -
 111
111 -
 112
112 -
 113
113 -
 114
114 -
 115
115 -
 116
116 -
 117
117 -
 118
118 -
119
-
120
-
121
-
122
-
123
-
124
-
125
-
126
-
127
-
128
-
129
-
130
-
131
-
132
-
133
 |
 |
