BenQ MH534 User Manual - Page 13
Remote control, Right, ECO BLANK, FREEZE, 3D SETTINGS, Keystone/Arrow keys, SOURCE
 |
View all BenQ MH534 manuals
Add to My Manuals
Save this manual to your list of manuals |
Page 13 highlights
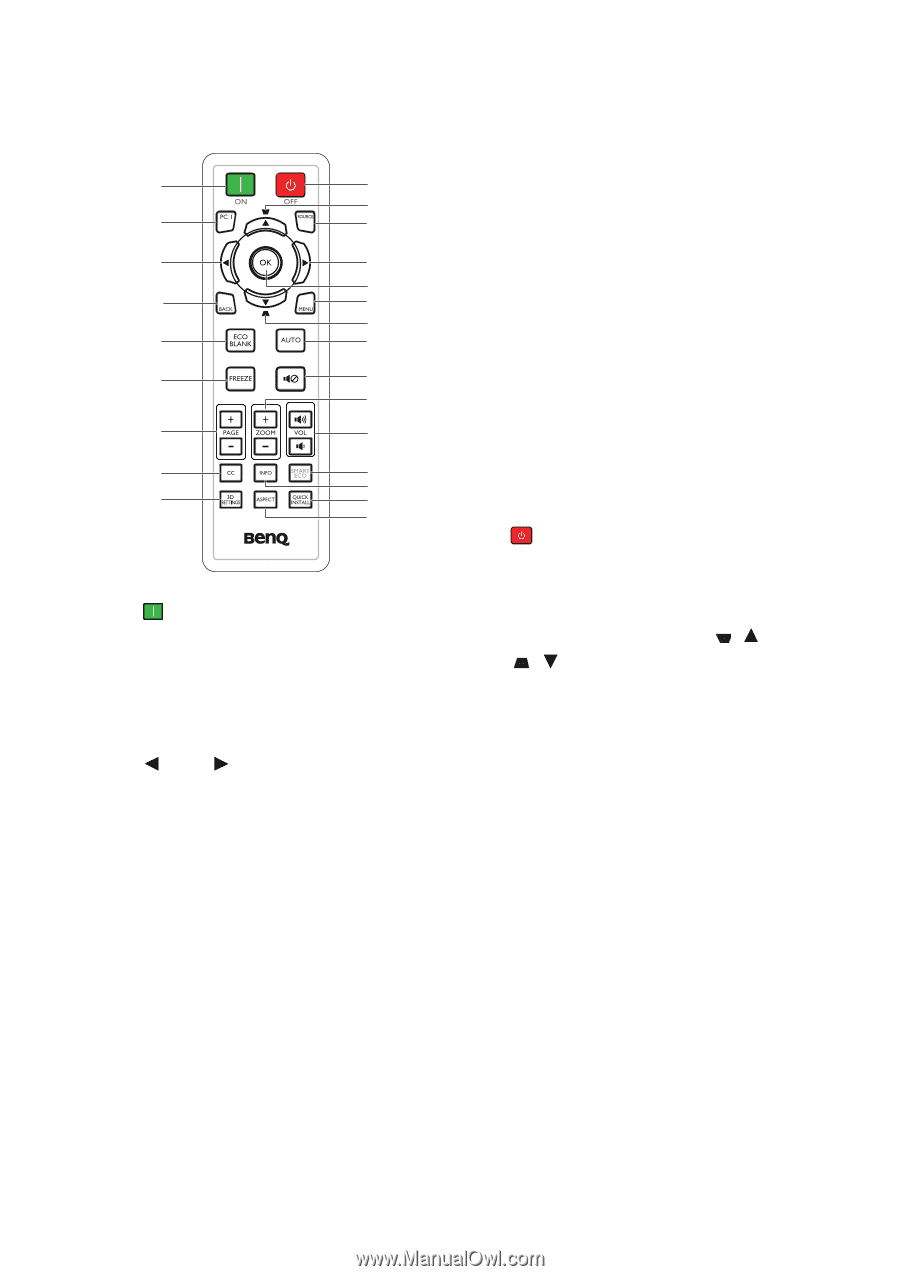
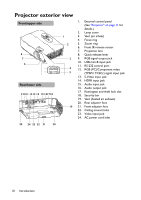
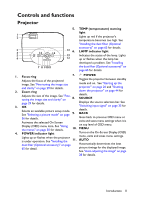
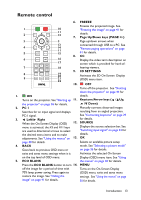
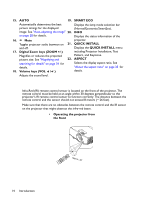
Remote control 6. FREEZE Freezes the projected image. See 1 10 "Freezing the image" on page 41 for 2 11 12 details. 7. Page Up/Down keys (PAGE +/-) 3 3 Page up/down arrows when 13 connected through USB to a PC. See 4 5 14 11 15 "Remote paging operations" on page 41 for details. 8. CC 6 16 Display the video term description on 17 screen which is provided for hard-of- 7 18 hearing viewers. 9. 3D SETTINGS 8 19 20 Activates the 3D On-Screen Display 9 21 22 (OSD) menu item. 10. OFF Turns off the projector. See "Shutting down the projector" on page 44 for 1. ON details. Turns on the projector. See "Starting up 11. Keystone/Arrow keys ( / Up, the projector" on page 26 for details. / Down) 2. PC 1 Manually corrects distorted images Searches for an input signal and displays resulting from an angled projection. PC-1 signal. See "Correcting keystone" on page 29 3. Left/ Right for details. When the On-Screen Display (OSD) 12. SOURCE menu is activated, the #3 and #11 keys Displays the source selection bar. See are used as directional arrows to select "Switching input signal" on page 33 for the desired menu items and to make details. adjustments. See "Using the menus" on 13. OK page 30 for details. Selects an available picture setup 4. BACK mode. See "Selecting a picture mode" Goes back to previous OSD menu or on page 36 for details. exits and saves menu settings when it is Activates the selected On-Screen on the top level of OSD menu. Display (OSD) menu item. See "Using 5. ECO BLANK the menus" on page 30 for details. Press the ECO BLANK button to turn 14. MENU off the image for a period of time with Turns on the On-Screen Display 70% lamp power saving. Press again to (OSD) menu, exits and saves menu restore the image. See "Hiding the image" on page 41 for details. settings. See "Using the menus" on page 30 for details. Introduction 13
-
 1
1 -
2
-
3
-
4
-
5
-
6
-
7
-
 8
8 -
 9
9 -
 10
10 -
 11
11 -
 12
12 -
 13
13 -
 14
14 -
 15
15 -
 16
16 -
 17
17 -
 18
18 -
19
-
20
-
21
-
22
-
23
-
24
-
25
-
26
-
27
-
28
-
29
-
30
-
31
-
32
-
33
-
34
-
35
-
36
-
37
-
38
-
39
-
40
-
41
-
42
-
43
-
44
-
45
-
46
-
47
-
48
-
49
-
50
-
51
-
52
-
53
-
54
-
55
-
56
-
57
-
58
-
59
-
60
-
61
-
62
-
63
-
64
-
65
-
66
-
67
-
68
-
69
-
70
-
71
-
72
-
73
-
74
 |
 |