Bernina 740 Manual - Page 10
Bernina 740 Manual
 |
View all Bernina 740 manuals
Add to My Manuals
Save this manual to your list of manuals |
Page 10 highlights
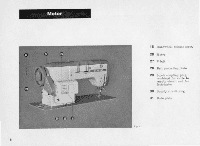
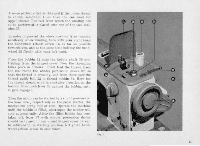
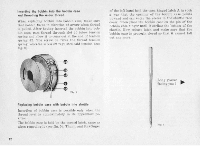
The Bernina-Favorite sewing machines, models 740 and 74], as well as 142. are driven by a horizontal motor fixed at the back of the machine on the balance-wheel side. Drive is effected by means of a %%belt acting directly onto the groove of the balancewheel. The coupling plug 29 is of the 3-pole type. The cable for the foolstarter, as well as the cablewith plug for junction to the electric supply circuit are both connected therewith. A so-called data or rating plate 31, giving particulars of the voltage and power of the motor, is fixed on the casing. Prior to connecting the flex to the mains, make definitely sure that the voltage Indicated nn the rating plate (i.e. the number of volts) corresponds to the mains voltage. Said mains voltage Is indicated on the current meter of your home. Dot not rely on the number of volts indicated on plugs and rockets! Care of the motor a) Lubrication The motor has friction bearings, by means of which a nearly silent running can be obtained. The bearings are automatically lubricated, so that they need no service at all. bi Corium brushes From time to lime the length of the carbon brushes should be seriously controlled. In order to accomplish this task, the upper and lower brush support plates, Sittiated at the front aide .1 the motor, mast be unscrewed and the carbon brushes removed. If these carbon brushes are not removed in due time, with a minimum length of IA", they will damage the collector and soon the motor can no more be used. When re-inserting the carbon brushes please take care that the ground rounding which must match with the rounding of the collector is not introduced the wrong way ! The seeing light The lamp is mounted in the swivelling head cover to enable ;In even distribution of light over the entire sewing urea, completely free from any glare. It is switched on and off by pressing the light button 6. The bulb can be changed as is usual currently with all lamps. Turn it to the left to remove, and to the right to insert. 9
-
 1
1 -
2
-
3
-
4
-
 5
5 -
 6
6 -
 7
7 -
 8
8 -
 9
9 -
 10
10 -
 11
11 -
 12
12 -
 13
13 -
 14
14 -
 15
15 -
16
-
17
-
18
-
19
-
20
-
21
-
22
-
23
-
24
-
25
-
26
-
27
-
28
-
29
-
30
-
31
-
32
-
33
-
34
-
35
-
36
-
37
-
38
-
39
-
40
-
41
-
42
-
43
-
44
-
45
-
46
-
47
-
48
-
49
-
50
-
51
-
52
-
53
-
54
-
55
-
56
-
57
-
58
-
59
-
60
-
61
-
62
-
63
-
64
-
65
-
66
-
67
-
68
-
69
-
70
-
71
-
72
-
73
-
74
-
75
-
76
-
77
-
78
-
79
 |
 |