Bernina 740 Manual - Page 22
respectively
 |
View all Bernina 740 manuals
Add to My Manuals
Save this manual to your list of manuals |
Page 22 highlights
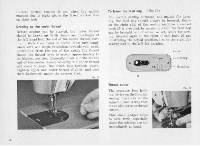
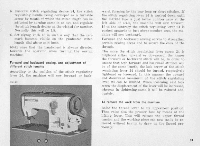
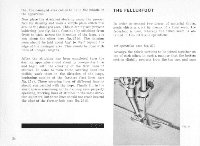
5. Unscrew stitch regulating device 24, the stitch regulating handle being developed as a turnable arrow by means of which the stitch length can he adjusted by turning same in or out, and regulate the Mitch length device on the wished for number. Normally this will be 6. Set zigzag knob 18 in such a way that the zero mark becomes visible en the graduated stitch length dial above said knob. Make sure that the handwheei is always directed towards the operator when turning the sewing machine. Forward and backward sewing, and adjustment of different stitch lenghts According to the position of the stitch regulating lever 21. the machine will sew forward or back- Ns. tl ward, forming by the way long or short stitches. If the stitch regulating lever 24 is pushed down until the marked line Is just below number zero at the left side of scale, the machine will sew forward. If to the contrary the stitch regulating lever 21 is pushed upwards to just abort number zero. the ma. chino will sew backward. Forward and backward sewing sen•e% to strengthen certain sewing areas and to secure the ends of the threads. The more the stitch regulating lever screw 21 is displayed either upward or downward, the longer the forward or backward stitch will be. In order to ensure that both forward and backward stitches will be of the same length, the lock screw of the stitch regulating lever 21 should be turned• respectively tightened or loosened. In this manner the upward and downward movement of the stitch regulating lever 21 can be limited. When loosening said lock screw the displacement of the lever will be increased, whereas in tightening same it will 1w reduced adeeuately. To remove the wort from the machine Raise the thread lever to Its uppermost position. Then raise also the preeser foot by means of the lifting lever. This will release the upper thread tension and the working pine can now easily be removed without having to draw on the thread previously. 21
-
 1
1 -
2
-
3
-
4
-
5
-
6
-
7
-
8
-
9
-
10
-
11
-
12
-
13
-
14
-
15
-
16
-
 17
17 -
 18
18 -
 19
19 -
 20
20 -
 21
21 -
 22
22 -
 23
23 -
 24
24 -
 25
25 -
 26
26 -
 27
27 -
28
-
29
-
30
-
31
-
32
-
33
-
34
-
35
-
36
-
37
-
38
-
39
-
40
-
41
-
42
-
43
-
44
-
45
-
46
-
47
-
48
-
49
-
50
-
51
-
52
-
53
-
54
-
55
-
56
-
57
-
58
-
59
-
60
-
61
-
62
-
63
-
64
-
65
-
66
-
67
-
68
-
69
-
70
-
71
-
72
-
73
-
74
-
75
-
76
-
77
-
78
-
79
 |
 |
