Bernina 740 Manual - Page 70
embroidery
 |
View all Bernina 740 manuals
Add to My Manuals
Save this manual to your list of manuals |
Page 70 highlights
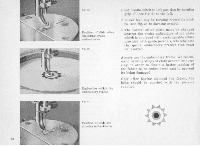
It will be of advantage to design Lhe holes previously on the fabric. Then place the material under the eyelet embroidery presser foot, so that the guide journal of the elide should come to lie in the hole. An has been mentioned already heretofore, the needle stitch should be set to left position. For both upper and bottom embroidery thread nu. 60-80 two•phy should be used, which will give beet results in even sewing around the holes. For eyelet embroidery the thread tension is of ut• moat importance. Thu under thread tension should be eligibly stronger than that of the top thread. so that the thread knots should only show themselves on the lower face of the fabric. The slide In the embroidery plate should be positioned In such a way that the needle, when making righthand stitch, enters in the recess of the guide journal exactly beyond the edge of the material. This setting has to be changed according to stitch width and should therefore be repeated every time. Then allow the sewing machine to operate at regular speed and turn the embroidery ring at the same time three or four times around the guide journal in the game regular way in clockwise direction. Finally set zigzag knob IS (see fig. 2) upon zero position and secure the thread by a few stitches. These binding stitches should be parallel to the embroidery stitches• so that they will remain practically invisible. When the slide of the stitch plate is ravened, as has been shown In fig. 97, the guide journal can be employed as a centre in sewing circular ombroi• deries. In doing so the needle pierces through the long slit of the slide. By changing the density of the stitches, i.e. by varying the speed of rotation of the embroidery ring during the stitching. and using threads of different colour,. very attractive and multifarious patterns egn be produced, enhancing by the way the look of the eyelet embroideries. As a rule kindly observe when executing eyelet embroidery works that the holes of the same sire should always be finished successively. so that the slide need of be changed ton often. Oa
-
 1
1 -
2
-
3
-
4
-
5
-
6
-
7
-
8
-
9
-
10
-
11
-
12
-
13
-
14
-
15
-
16
-
17
-
18
-
19
-
20
-
21
-
22
-
23
-
24
-
25
-
26
-
27
-
28
-
29
-
30
-
31
-
32
-
33
-
34
-
35
-
36
-
37
-
38
-
39
-
40
-
41
-
42
-
43
-
44
-
45
-
46
-
47
-
48
-
49
-
50
-
51
-
52
-
53
-
54
-
55
-
56
-
57
-
58
-
59
-
60
-
61
-
62
-
63
-
64
-
 65
65 -
 66
66 -
 67
67 -
 68
68 -
 69
69 -
 70
70 -
 71
71 -
 72
72 -
 73
73 -
 74
74 -
 75
75 -
76
-
77
-
78
-
79
 |
 |