Bissell CleanView Bagless Vacuum Cleaner 1831 User Guide - Page 5
Assembly
 |
View all Bissell CleanView Bagless Vacuum Cleaner 1831 manuals
Add to My Manuals
Save this manual to your list of manuals |
Page 5 highlights
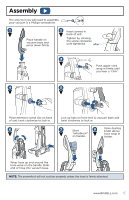
Assembly The only tool you will need to assemble your vacuum is a Phillips screwdriver. 1 2 Insert screws in back of unit. Place handle on vacuum base and press down firmly. Tighten by rotating the screw clockwise until tightened. 3 click Push upper cord wrap in firmly until you hear a "click". 4 5 Place extension wand clip on back of unit, twist clockwise to lock in. 6 Line up tabs on hose end to vacuum base and twist clockwise to lock in. 7 Store 8 Store dusting brush above TurboBrush® hose wrap in on handle. holder. Wrap hose up and around the hose wrap on the handle. Slide end of hose into vacuum base. NOTE: The powerfoot will not suction properly unless the hose is firmly attached. www.BISSELL.com 5
-
 1
1 -
 2
2 -
 3
3 -
 4
4 -
 5
5 -
 6
6 -
 7
7 -
 8
8 -
 9
9 -
 10
10 -
 11
11 -
12
 |
 |

www.BISSELL.com
5
1
Insert screws in
back of unit.
Tighten by rotating
the screw clockwise
until tightened.
Place handle on
vacuum base and
press down firmly.
Assembly
The only tool you will need to assemble
your vacuum is a Phillips screwdriver.
Push upper cord
wrap in firmly until
you hear a “click”.
Place extension wand clip on back
of unit, twist clockwise to lock in.
click
2
3
4
5
6
7
8
Line up tabs on hose end to vacuum base and
twist clockwise to lock in.
NOTE:
The powerfoot will not suction properly unless the hose is firmly attached.
Wrap hose up and around the
hose wrap on the handle. Slide
end of hose into vacuum base.
Store
TurboBrush®
on handle.
Store dusting
brush above
hose wrap in
holder.