Bissell DigiPro® Canister Vacuum 6900 User Guide - English - Page 9
Cleaning the DirtLifter, PowerBrush, Replacing the Drive Belt, Replacing The Light Bulb
 |
View all Bissell DigiPro® Canister Vacuum 6900 manuals
Add to My Manuals
Save this manual to your list of manuals |
Page 9 highlights
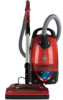
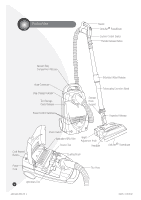
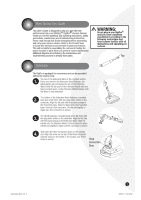
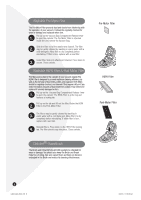
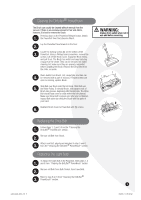
Cleaning the DirtLifter® PowerBrush The Brush can usually be cleaned without removal from the vacuum. If there is an excessive amount of hair and debris, however, it is best to remove the Brush. Pressing down on the Powerfoot Release button, detach 1. the Powerfoot from the Extension Wand. Lay the Powerfoot face forward on the floor. 2. Locate the locking screws (6) on the bottom of the 3. Powerfoot. Using a Phillips head screwdriver, remove the screws. Lift off the Brush Cover. Grasp the Brush firmly, and pull it out. The Brush has metal end caps featuring a square at the center. They can be removed for easier cleaning, but make sure they are properly reinserted before installing the Brush. Remove the Drive Belt from the roller, set aside. Clean debris from Brush. Lint, carpet pile, and hair can 4. be removed with a pair of scissors. If brush bristles are worn or missing, replace Brush. Slide Belt over Brush onto the belt track. Slide Belt over 5. the Motor Pulley. To reinstall Brush, slide square ends of Brush into grooves, beginning with the Belt side. The Drive Belt should have room to rotate within the belt channel. Make sure Drive Belt is looped over roller and not twisted. Inspect Belt action by rolling the Brush with the palm of your hand. Reattach Brush Cover to Powerfoot with (6) screws. 6. Replacing the Drive Belt Follow steps 1, 2 and 3 from the "Cleaning the 1. DirtLifter® PowerBrush" section. Remove old Belt from Brush. 2. Attach new Belt, aligning as indicated in step 5 and 6 3. from the "Cleaning the DirtLifter® PowerBrush" section. Replacing The Light Bulb To replace the Light Bulb in the Powerfoot, follow steps 1, 2 1. and 3 from "Cleaning the DirtLifter® PowerBrush" section. Remove old Bulb from Bulb Socket. Insert new Bulb. 2. Refer to step 5 an 6 from "Cleaning the DirtLifter® 3. PowerBrush" section. ug603-4424_6900_705 9 WARNING: Unplug from outlet when not in use and before servicing. 9 8/23/05 11:39:06 AM
-
 1
1 -
2
-
3
-
 4
4 -
 5
5 -
 6
6 -
 7
7 -
 8
8 -
 9
9 -
 10
10 -
 11
11 -
 12
12
 |
 |