Bissell ReadyClean Deep Cleaner 40N7 User Guide - Page 8
Mainµn°ce & Care
 |
View all Bissell ReadyClean Deep Cleaner 40N7 manuals
Add to My Manuals
Save this manual to your list of manuals |
Page 8 highlights
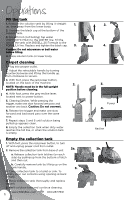
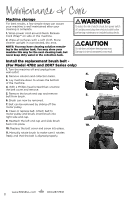
Maintenance & Care Machine storage For best results, a few simple steps can assure your machine is well maintained after your cleaning is complete. 1. Wrap power cord around Quick Release Cord Wrap™ on side of the machine. 2. Wipe all surfaces with a soft cloth. Store cleaner upright in a protected, dry area. NOTE: You may have cleaning solution remaining in the solution tank. You may store your machine this way for the next cleaning task, but never keep dirty water in the collection tank. WARNING To reduce the risk of electric shock, turn power switch off and disconnect plug from electrical outlet before performing maintenance or troubleshooting checks. CAUTION Do not store unit where freezing may occur. Damage to internal components may result. Install the replacement brush belt (For Model 47B2 and 20R7 Series only) 1. Turn the machine off and unplug from wall outlet. 4. 2. Remove solution and collection tanks. 3. Lay machine down to access the bottom of the machine. 4. With a Phillips head screwdriver, unscrew the belt cover and remove. 5. Remove the brush end cap and remove 5. belt from brush. 6. Brush can now be removed. 7. Belt can be removed by sliding off the motor pulley. 8. Clean or replace belt. Attach belt to motor pulley and brush, insert brush into right side end cap. 9. Reattach the left end cap and slide brush back into place. 10. 10. Replace the belt cover and screw into place. 11. Manually rotate brush to make sure it rotates freely and that the belt is aligned properly. www.bissell.com 8 800.237.7691
-
 1
1 -
2
-
 3
3 -
 4
4 -
 5
5 -
 6
6 -
 7
7 -
 8
8 -
 9
9 -
 10
10 -
 11
11 -
 12
12 -
 13
13 -
14
-
15
-
16
-
17
-
18
-
19
-
20
-
21
-
22
-
23
-
24
 |
 |
