Bissell Zing Bagless Canister Vacuum Zing® User's Guide - Page 5
Warning - in store
 |
View all Bissell Zing Bagless Canister Vacuum manuals
Add to My Manuals
Save this manual to your list of manuals |
Page 5 highlights
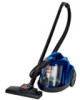
Assembly 1. Connect hose to vacuum by inserting hose connector on the end of the hose into the suction inlet. Make sure the hose is positioned so the tabs on the hose connector line up with the notches on the suction inlet. Once inserted into the suction inlet, turn clockwise to lock into place. 2. Attach extension wands section together by inserting into one another and twisting slightly to tighten. 3. Connect hose handle to the end of the extention wand and twist slightly to tighten. 4. Connect floor nozzle to the end of the extension wand and twist slightly to tighten. 5. Once assembled, you can store your vacuum by inserting the storage clip (located on the back of the floor nozzle) into the storage slot on the rear of the vacuum. WARNING: Plastic film can be dangerous. To avoid danger of suffocation, keep away from babies and children. 1. Suction Inlet 2. 3. 4. 5. www.bissell.com 5 800.237.7691
-
 1
1 -
 2
2 -
 3
3 -
 4
4 -
 5
5 -
 6
6 -
 7
7 -
 8
8 -
 9
9 -
 10
10 -
 11
11 -
12
-
13
-
14
-
15
-
16
 |
 |
