Black & Decker MTC220 Instruction Manual - Page 6
Functional Description - spool
 |
View all Black & Decker MTC220 manuals
Add to My Manuals
Save this manual to your list of manuals |
Page 6 highlights
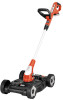
FUNCTIONAL DESCRIPTION 1. Switch 2. Battery 3. Auxillary Handle 4. Collar (to adjust height and edge) 5. Motor Housing 6. Edge Guide 7. Guard 8. Spool 1 2 3 4 5 This product can accept any of the 6 batteries and chargers listed in the chart below. LI-ION Battery Packs and Chargers Description Batteries: LI-ION Chargers: LI-ION 7 8 Cat. # LBX20 LBXR20 LBXR2020 LB2X4020 LCS1620 L2AFCBST L2AFC Charging Procedure The standard charger provided will 1 charge a fully depeleted battery in about 4 hours. 1. Plug the charger into an appropriate outlet before inserting the battery pack. 2. Insert the battery pack into the charger as shown in figure 1. 3. The green LED will flash indicating that the battery is being charged. 4. The completion of charge is indicated by the green LED remaining on continuously. The pack is fully charged and may be used at this time or left on the charger. Recharge discharged batteries as soon as possible after use or battery life may be greatly diminished. Leaving the battery in the charger The charger and battery pack can be left connected with the green LED glowing indefinitely. The charger will keep the battery pack fresh and fully charged. Important Charging Notes 1. Longest life and best performance can be obtained if the battery pack is charged when the air temperature is between 60°F and 80°F (16°- 27°C). DO NOT charge the battery pack in an air temperature below +40°F (+4.5°C), or above +105°F (+40.5°C). This is important and will prevent serious damage to the battery pack. 2. The charger and battery pack may become warm to touch while charging. This is a normal condition, and does not indicate a problem. To facilitate the cooling of the battery pack after use, avoid placing the charger or battery pack in a warm environment such as in a metal shed, or an uninsulated trailer. 3. If the battery pack does not charge properly: a. Check current at receptacle by plugging in a lamp or other appliance 6
-
 1
1 -
 2
2 -
 3
3 -
 4
4 -
 5
5 -
 6
6 -
 7
7 -
 8
8 -
 9
9 -
 10
10 -
 11
11 -
 12
12 -
13
-
14
-
15
-
16
-
17
-
18
-
19
-
20
-
21
-
22
-
23
-
24
-
25
-
26
-
27
-
28
-
29
-
30
-
31
-
32
-
33
-
34
-
35
-
36
-
37
-
38
-
39
-
40
-
41
-
42
-
43
-
44
 |
 |
