Bosch 1873-8 Operating Instructions - Page 11
Wire Brush Operations
 |
UPC - 000346342864
View all Bosch 1873-8 manuals
Add to My Manuals
Save this manual to your list of manuals |
Page 11 highlights
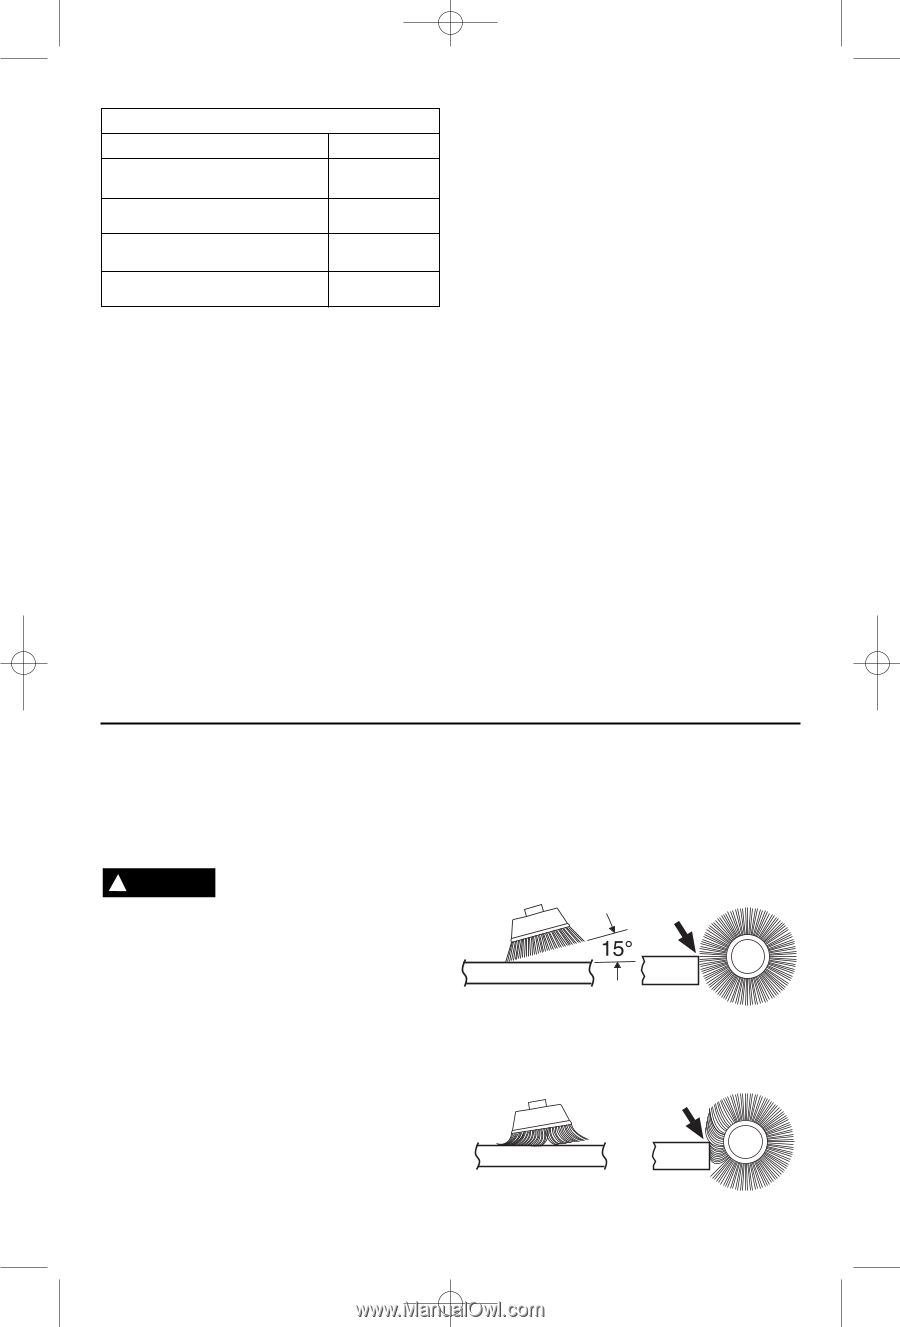
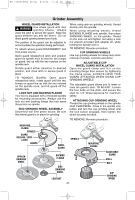
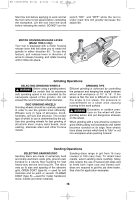
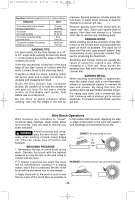
BM 1609929H54 08-06 8/3/06 11:44 AM Page 11 Operation: Refinishing painted wood or metal surfaces. REMARKS GRIT To remove paint and to smooth surface irregularities. To smooth the rough sanding. To remove scratches left by previous discs. To smooth surfaces for painting, polishing or waxing. Coarse 16-24-30 Medium 36-50-80 Fine 100-120 Very Fine 150-180 SANDING TIPS For best results, tilt the Disc Sander at a 10° to 15° angle while sanding so that only about 1" of the surface around the edge of the disc contacts the work. If the disc (accessory) is held flat or the back edge of the disc comes in contact with the work, a violent thrust to the side may result. If sander is tilted too much, sanding action will be too great and a rough cut surface or gouging and snagging will result. Guide the Disc Sander with crosswise strokes. Be careful not to hold the sander in one spot too long. Do not use a circular motion, as this makes swirl marks. Test before use on scrap stock. Do not force or apply pressure when sanding. Use only the weight of the tool for pressure. Excess pressure actually slows the tool down. If faster stock removal is desired, change to a coarser grit disc. Remove gummy paint from metal with an "open coat" disc. Sand until sparks start to appear, then stop and change to a "closed coat" disc to remove any remaining paint. SANDING WOOD When sanding wood the direction of the disc motion at the contact point should parallel the grain as much as possible. The rapid cut of discs and the swirl type scratch pattern they occasionally create generally prohibit their use for producing the final finish. Scratches and circular marks are usually the result of using too coarse a grit. When changing to a finer grit, move across the sanding lines that were made by a previous coarser disc. SANDING METAL When sanding automobiles or appliances, wipe the metal clean with a non-flammable solvent or commercial cleaner to remove all wax and grease. By doing this first, the sanding discs will sand better and last longer. For heavy duty work, use a coarse grit disc first. Follow-up with a medium grit to remove scratches. To produce smooth finish, use fine grit disc. Wire Brush Operations Wire brushes are intended to "clean" structural steel, castings, sheet metal, stone and concrete. They are used to remove rust, scale and paint. in full contact with the work. Applying the side or edge of the brush to the work will result in wire breakage and shortened brush life. ! WARNING Avoid bouncing and snagging the wire brush, espe- cially when working corners, sharp edges etc. This can cause loss of control and kickback. CORRECT: Wire tips doing the work. BRUSHING PRESSURE 1. Remember, the tips of a wire brush do the work. Operate the brush with the lightest pressure so only the tips of the wire come in contact with the work. 2. If heavier pressures are used, the wires will be overstressed, resulting in a wiping action; and if this is continued, the life of the brush will be shortened due to wire fatigue. INCORRECT: Excessive pressure can cause wire breakage. 3. Apply the brush to the work in such a way that as much of the brush face as possible is -11-
-
 1
1 -
2
-
3
-
4
-
5
-
 6
6 -
 7
7 -
 8
8 -
 9
9 -
 10
10 -
 11
11 -
 12
12 -
 13
13 -
 14
14 -
 15
15 -
 16
16 -
17
-
18
-
19
-
20
-
21
-
22
-
23
-
24
-
25
-
26
-
27
-
28
-
29
-
30
-
31
-
32
-
33
-
34
-
35
-
36
 |
 |