Bosch 53514B Operating Instructions - Page 9
Operating Instructions
 |
UPC - 000346325706
View all Bosch 53514B manuals
Add to My Manuals
Save this manual to your list of manuals |
Page 9 highlights
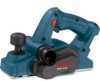
BM 2610925944 6-05 6/10/05 11:50 AM Page 9 Operating Instructions TRIGGER "ON/OFF" SWITCH ! WARNING Hold the tool with both hands while starting the tool, since torque from the motor can cause the tool to twist. To turn tool "ON", depress the "Lock-OFF" button and squeeze the trigger switch. To turn the tool "OFF", release the trigger switch which is spring loaded and will return to "OFF" position automatically. To increase switch life, do not turn switch on and off while tool and drum are held against a workpiece. BRAKE When the trigger is released it activates the electrical brake to stop the blade quickly. This feature is especially useful when making repetitive cuts. PLANING ACTION Check that the workpiece is held in place securely on your work surface, and standing comfortably, hold the planer firmly with both hands. With the planer fully adjusted, place the front shoe on the workpiece, (be certain that the cutter drum is not in contact with the work) and start the planer as described earlier. With pressure on the front shoe, and the fence against the side of the work (to control the width or angle,) feed the planer steadily until the rear shoe fully engages the workpiece. Now gradually transfer pressure to the rear shoe, and continue planing to the end of the cut. Feed the planer at a uniform and reasonable rate, which does not put excessive strain on the motor or blades, (do not pull the planer back over the surface already cut.) Use progressive cuts until you are near the desired depth, and then readjust to a light cut for the final pass to obtain a good surface finish. ! CAUTION The motor may stall if improperly used or overloaded. Reduce the pressure (feed rate) or depth of cut to prevent possible damage to the tool if the motor labors. ADJUSTING DEPTH OF CUT Proper cutting depth should be determined according to the hardness, gumminess or moisture content of the material being cut, as well as the feed rate, and is largely a matter of experience. Start with a light cut and increase the depth setting if the plane moves freely through the workpiece with no excessive load on the motor. Do not change depth of cut while planing. The cutting depth is determined by the difference in height between the adjustable front shoe, and the fixed rear shoe of the planer. As the front shoe is adjusted, it retracts and exposes the blade, which can then remove the desired amount from the workpiece. The cutting depth is graduated from 0 to 1/16 of an inch, and the "0" indicates the blade is fully retracted. Installing the guide fence: Place the wing knob through the appropriate hole in the guide bracket and screw into the housing. Securely tighten wing knob. Setting the cutting width: Loosen wing knob and slide the fence along the guide bracket to the desired position. Securely tighten wing knob. Be certain that the flat washer (supplied) is fitted between the bottom of the guide fence and wing knob or the guide fence is likely to slip. DELUXE ANGLE FENCE The optional deluxe angle fence (Fig. 6) can be used to cut various desired widths, with the additional capability of guiding the planer FIG. 6 Adjusting depth of cut: Rotate depth adjustment knob until the indicator engages the detent which indicates the desired cutting depth on the depth scale (Fig. 1). The planer may be set to cut any depth from 0 to 1/16 of an inch. STANDARD PARALLEL WIDTH GUIDE FENCE The width guide fence can be used to cut various desired widths (Fig. 1). 8 mm max 82 mm max -9-
-
 1
1 -
2
-
3
-
 4
4 -
 5
5 -
 6
6 -
 7
7 -
 8
8 -
 9
9 -
 10
10 -
 11
11 -
 12
12 -
 13
13 -
 14
14 -
15
-
16
-
17
-
18
-
19
-
20
-
21
-
22
-
23
-
24
-
25
-
26
-
27
-
28
-
29
-
30
-
31
-
32
-
33
-
34
-
35
-
36
-
37
-
38
-
39
-
40
-
41
-
42
-
43
-
44
 |
 |
