Bosch HBLP451RUC Installation Instructions - Page 13
To replace the oven door
 |
View all Bosch HBLP451RUC manuals
Add to My Manuals
Save this manual to your list of manuals |
Page 13 highlights
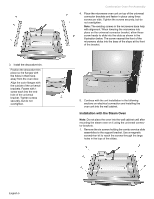
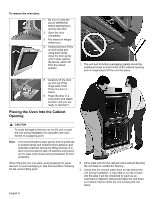
4. Guide the unit straight back into the cabinet cutout. Note: Be careful not to crimp the flexible conduit between the oven and the cabinet back wall. If necessary, guide the flexible conduit into the wall or cabinet access hole so it doesn't prevent the unit from being pushed all the way into the cabinet opening. The oven should be straight and level, not crooked. 5. Install the oven bottom trim while the door is removed and the unit is in place. (Do not push the unit all the way in, leave about 1 inch extending from the front of the cabinet). Use two of the screws provided in the red bag included with the trim piece. 1. Align holes in trim ends with holes at bottom of oven. 2. Insert screws and tighten firmly. Do not overtighten. 3. Push the unit straight in until the oven trim is flush with the front of the cabinet trim. 4. Install supplied screws through tap holes in trim. (2 screws for single ovens, 4 screws for double/combo ovens). To replace the oven door: 1. Hold the door firmly in both hands. 2. Hold the door at a 30º angle from the closed position and insert hinges into the slots. You may need to rock the door forward and backward slightly to seat the hinge feet. 3. The door may need to be removed and reinserted until the hinges sit correctly in the slots. 4. Open door all the way to expose hinges, levers, and slots. 5. Push levers forward and down until seated on the bracket. 6. Close and open door slowly to be sure it is correctly and securely in place. Door must be straight, not crooked. English 10
-
 1
1 -
2
-
3
-
4
-
5
-
6
-
7
-
 8
8 -
 9
9 -
 10
10 -
 11
11 -
 12
12 -
 13
13 -
 14
14 -
 15
15 -
 16
16 -
 17
17 -
 18
18 -
19
-
20
-
21
-
22
-
23
-
24
-
25
-
26
-
27
-
28
-
29
-
30
-
31
-
32
-
33
-
34
-
35
-
36
-
37
-
38
-
39
-
40
-
41
-
42
-
43
-
44
-
45
-
46
-
47
-
48
-
49
-
50
-
51
-
52
-
53
-
54
-
55
-
56
 |
 |
