Bosch LTC 5136/61 Instruction Manual - Page 14
Controller Operation - users manual
 |
View all Bosch LTC 5136/61 manuals
Add to My Manuals
Save this manual to your list of manuals |
Page 14 highlights
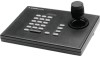
LTC 5136 Series | Instruction Manual | Controller Operation EN | 14 5. Press ON-1-ENTER and the address is set. Once the Fast Address is set, the switch address (thumbwheel) is ignored. The Fast Address is stored to non-volatile memory, and will not change if power is removed or factory defaults are restored (SET-899-ENTER). • To reset the dome's address to the switch address (thumbwheel), repeat the above steps and end by pressing OFF-1-ENTER. • To check/confirm the address, call up the camera and press ON-997-ENTER. This command causes all cameras to briefly display their addresses. 6 CONTROLLER OPERATION Operation is quite simple. If the camera number to be controlled is not visible in the LED displays, use the numeric keypad to select the desired camera, then press ENTER. The camera can now be operated using the appropriate joystick and/or lens controls. If appropriate, pre-position scenes and auxiliary functions can also be entered. Note that a delay of more than 3-4 seconds while entering a selection results in the Controller returning to the default camera entry mode. If this condition occurs, start the selection again, from the beginning. A complete description of the controls and indicators is provided in the next section. 6.1 Controls/Indicators LED Indicators: The four digit, 7-segment LED display is used to display data entry and the selected camera number. SET key: This key is used to set pre-position scenes of all AutoDome cameras and Allegiant Series Receiver/ Drivers which are equipped with this option. Operate the joystick and lens controls to position the camera to the desired scene to be programmed. Press SET, then enter the desired pre-position number on the numeric keypad (1 to 99). Press ENTER to store the position. Certain pre-position numbers are also used to program certain AutoDome features. Refer to the AutoDome operation manual for a complete listing of the available features. to ensure that all Controller LEDs and buttons are in working order. It also automatically calibrates the center position of the analog joystick. Upon entering this mode, the Controller sounds a short beep. The display readouts and LEDs behind the first two rows of buttons also illuminate for about two seconds. During this time, the joystick undergoes calibration, so be careful not to move it until the LED displays have gone dark. The operator should note any LED display failures during the time they are illuminated. Each key may now be pressed to display a unique code number associated with that key. Use the table below to ensure that all keys are operating properly. Push the USER key last, as this will cause the Controller to exit the test mode. Key Set Camera Shot On Off 1 2 3 4 5 6 7 8 Number 0009 0025 0010 0018 0026 0011 0019 0027 0012 0020 0028 0013 0021 Key 9 0 Enter Clear Focus (up) Focus (down) Iris (up) Iris (down) Up Down Left Right Zoom (CW) Zoom (CCW) Number 0029 0014 0030 0038 0043 0044 0045 0046 1x53 0x51 1x52 0x54 1x41 0x42 NOTE: The x digit shown in the number column, for up, down, left, right, and zoom values, indicates a speed value, and will change based on how far the control is activated. USER key: Press USER-1-ENTER to enter the Controller diagnostic mode. This function can be used Bosch Security Systems | 04 September 2003
-
 1
1 -
2
-
3
-
4
-
5
-
6
-
7
-
8
-
 9
9 -
 10
10 -
 11
11 -
 12
12 -
 13
13 -
 14
14 -
 15
15 -
 16
16 -
 17
17 -
 18
18 -
 19
19 -
20
 |
 |
