Bosch WFMC5301UC Pedestal Installation Instructions - Page 5
Notice, Caution - 13
 |
UPC - 825225852117
View all Bosch WFMC5301UC manuals
Add to My Manuals
Save this manual to your list of manuals |
Page 5 highlights
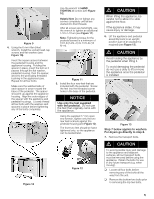
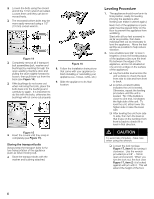
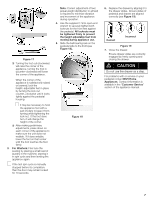
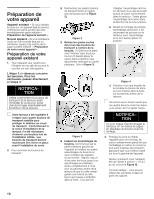
Figure 9 4. Using the 6 mm Allen (Hex) wrench, install the socket head cap screws and flat washers (see Figure 10). Insert the square spacer between the pedestal housing and the appliance housing. Holding the spacer in place, insert the bolt so it passes through the flat washer, pedestal housing, then the spacer, and into the protruding threaded bushing in the appliance base. Repeat for all four bolts. Make sure the webbed side of each spacer is down toward the base of the pedestal. The spacer should fit up against the appliance housing. Align the outer edges of the spacer with the appliance and pedestal housings. Loosely thread all four bolts with the washers and spacers in place before tightening any of the bolts completely. Use the wrench to HAND TIGHTEN all screws (see Figure 10). Helpful hint: Do not tighten any screws completely until all are started into their threads. After all screws are hand tight, use the wrench to tighten an additional 1/3 to 1/2 turn (see Figure 11). Note: Tightening torque for the pedestal screws is a minimum of 10 ftĆlb (14 N-m) to 13 ft-lb (18 N-m). Figure 11 5. Install the four new feet that are included with the pedestal. Screw the feet into the threaded corner holes in the base of the pedestal. NOTICE Use only the feet supplied with the pedestal. Do not use the feet that originally came with the appliance. Using the supplied 17 mm open end wrench, tighten only the two rear feet locknuts against the pedestal housing (see Figure 12). The front two feet should be hand tightened only, so the appliance can be leveled later. Figure 10 Figure 12 d CAUTION When lifting the appliance, be careful not to allow it to slide against the floor. If the appliance slides, it may cause injury or damage. 6. Lift the appliance and pedestal assembly back to an upright position (use of an assistant is required) (see Figure 13). d CAUTION Avoid holding the appliance by the pedestal when lifting it. To avoid damaging the pedestal do not use a dolly to lift or move the appliance once the pedestal is installed. Figure 13 Step 7 below applies to washers. For dryers go directly to step 8. 7. Remove the transport bolts. d CAUTION To avoid possible injury and damage to the appliance and adjacent surfaces, all four transport bolts must be removed before using the appliance. Retain the bolts for use in any future transport (e.g. when moving). q Loosen all four bolts before removing any of the bolts all the way from the unit. q Remove the bottom two bolts prior to removing the top two bolts. 5
-
 1
1 -
 2
2 -
 3
3 -
 4
4 -
 5
5 -
 6
6 -
 7
7 -
 8
8 -
 9
9 -
 10
10 -
 11
11 -
12
-
13
-
14
-
15
-
16
-
17
-
18
-
19
-
20
-
21
-
22
-
23
-
24
 |
 |
