Bose L1 Pro8 Portable Line Array English Owners Guide - Page 8
Connecting Power, AutoOff/Low-power Standby, Channel 1 & 2 Controls
 |
View all Bose L1 Pro8 Portable Line Array manuals
Add to My Manuals
Save this manual to your list of manuals |
Page 8 highlights
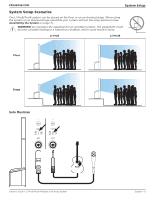
System Setup Connecting Power 1. Plug the power cord into the Power Input on the L1 Pro. q w 2. Plug the other end of the power cord into a live electrical outlet. Note: Do not power on the system until after you've connected your sources. See Connecting Sources below. 3. Press the Standby Button. The LED will illuminate white while the system is on. Note: Press and hold the Standby Button for 10 seconds to reset the system to factory settings. AutoOff/Low-power Standby After four hours of no use, the L1 Pro will enter AutoOff/Low-power Standby mode to save power. To wake the system from AutoOff/Low-power Standby mode, press the Standby Button. Connecting Sources Channel 1 & 2 Controls Channel 1 and 2 are for use with microphones, guitars, keyboards, or other instruments. Channel 1 and 2 will automatically detect a q source input level to adjust volume taper and gain stage. 1. Connect your sound source to the Channel Input with the appropriate cable. 2. Apply a ToneMatch preset-to optimize the sound of your microphone or instrument-by pressing the Channel ToneMatch Button until the LED for your chosen preset is illuminated. Use MIC for microphones and use INST for acoustic guitars and other instruments. Use OFF if you do not want to apply a preset. Note: Use the L1 Mix app to choose custom presets from the ToneMatch library. The corresponding LED will illuminate green when a custom preset is selected. 3. Press the Channel Parameter Control to choose a parameter to modify. The parameter name will illuminate white while it is selected. 4. Rotate the Channel Parameter Control to adjust the level of the selected parameter. The parameter LED will indicate the level of the selected parameter. Note: While Reverb is selected, press and hold the control for two seconds to mute the reverb. While reverb is muted, Reverb will flash white. To unmute reverb, press and hold for two seconds while Reverb is selected. Reverb mute will reset when the system is powered off. PRO.BOSE.COM e w INST e r 8 • English L1 Pro8/Pro16 Portable Line Array System • Owner's Guide
-
 1
1 -
2
-
 3
3 -
 4
4 -
 5
5 -
 6
6 -
 7
7 -
 8
8 -
 9
9 -
 10
10 -
 11
11 -
 12
12 -
 13
13 -
14
-
15
-
16
-
17
-
18
 |
 |
