Bose Lifestyle 3 Series II Owner's guide - Page 13
remote, control, radio, channel, spacing, voltage, systems, music, system
 |
View all Bose Lifestyle 3 Series II manuals
Add to My Manuals
Save this manual to your list of manuals |
Page 13 highlights
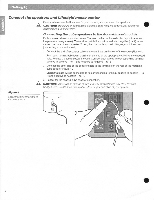
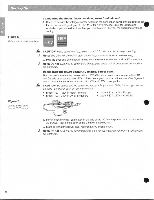
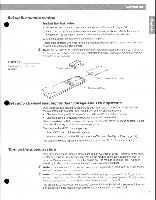
Setting Up Set up the remote control • Install the batteries 1. Slide open the battery compartment on the back of the remote (Figure 13). 2. Insert 3 AA or IEC-R6 1.5V batteries, or the equivalent, as shown. Match the + and symbols on the batteries with the + and - markings inside the compartment. 3. Slide the battery compartment cover back into place. Replace the batteries when the remote control stops operating or its range seems reduced. Alkaline batteries are recommended. Note: Do not change the settings of the factory•preset miniature switches. See "Changing the house code settings" on page 19 for information on how to prevent conflicts with other Lifestyle music systems. Figure 13 Installing the remote control batteries 3 AA batteries Battery compartment cover 41:4„ Miniature switches S et radio channel spacing for dual voltage and 120V systems Dual voltage music centers (which include both 120V and 230V power packs) and 120V music centers can be set for two types of AM and FM channel spacing. • Channel spacing for North America is 10 kHz for AM and 200 kHz for FM. • Channel spacing for Europe is 9 kHz for AM and 50 kHz for FM. Your dual voltage or 120V music center is factory preset for North American spacing. Select the channel spacing most appropriate for your area. To change AM and FM channel spacing: 1. Press OFF to turn off the music system. 2. Press and release the ERASE key under the CD cover. (See Figure 15 on page 15.) The display indicates US for North American spacing and EU for European spacing. Turn on the music system Plug the Acoustimassz module power cord into an AC (mains) outlet. Then plug in the music center power pack. Turn the power switch on the module connection panel to the ON (I) position. We recommend you leave this switch on. The module uses less than 7 watts of electricity in standby mode (about the same as an average night light). Note: Your speakers willnot operate unless you complete all cable andpower connections before turning on the music center. Note: If your system will be unattended for a few days, you may want to unplug your music • center to prevent a neighbor's Lifestyle° remote control or your pets from accidentally turning it on. In addition, see "Changing the house code settings" on page 19. You are ready to enjoy your new Lifestyle" system. Refer to the following pages for informa- tion on operating the music center controls and the Lifestyle' remote control. 13
-
 1
1 -
2
-
3
-
4
-
5
-
6
-
7
-
 8
8 -
 9
9 -
 10
10 -
 11
11 -
 12
12 -
 13
13 -
 14
14 -
 15
15 -
 16
16 -
 17
17 -
 18
18 -
19
-
20
-
21
-
22
-
23
-
24
-
25
-
26
 |
 |
