Bose SoundTouch Outdoor Wireless With 151 Owners Guide - Page 4
Mounting procedure
 |
View all Bose SoundTouch Outdoor Wireless With 151 manuals
Add to My Manuals
Save this manual to your list of manuals |
Page 4 highlights
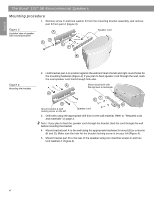
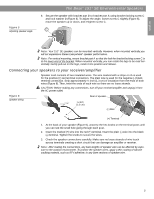
English The Bose® 151® SE Environmental Speakers Mounting procedure 1. Remove screw C and lock washer D from the mounting bracket assembly, and remove part B from part A (Figure 3). Figure 3 Exploded view of speaker and mounting bracket A D C E F Speaker cord B Figure 4 Mounting the brackets 2. Hold bracket part A in position against the wall and mark the left and right round holes for the mounting hardware (Figure 4). If you plan to feed speaker cord through the wall, mark the oval speaker cord feed-through hole also. A Mount bracket B with flat end next to terminals. H F E G B Mount bracket A with locking screw on the left. Speaker cord 3. Drill holes using the appropriate drill bits for the wall material. Refer to "Required tools and materials" on page 3. Note: If you plan to feed the speaker cord through the bracket, feed the cord through the wall before mounting the bracket. 4. Mount bracket part A to the wall using the appropriate hardware for wood (G) or concrete (H and G). Make sure the hole for the bracket locking screw is on your left (Figure 4). 5. Mount bracket part B to the rear of the speaker using two machine screws E and two lock washers F (Figure 4). 4
-
 1
1 -
 2
2 -
 3
3 -
 4
4 -
 5
5 -
 6
6 -
 7
7 -
 8
8 -
 9
9 -
 10
10 -
11
-
12
-
13
-
14
-
15
-
16
-
17
-
18
-
19
-
20
-
21
-
22
-
23
-
24
-
25
-
26
-
27
-
28
-
29
-
30
-
31
-
32
-
33
-
34
-
35
-
36
-
37
-
38
-
39
-
40
-
41
-
42
-
43
-
44
-
45
-
46
-
47
-
48
-
49
-
50
-
51
-
52
 |
 |
