Bowflex Blaze Owners Manual - Page 49
Seated Hip Adduction, Seated Hip Abduction
 |
View all Bowflex Blaze manuals
Add to My Manuals
Save this manual to your list of manuals |
Page 49 highlights
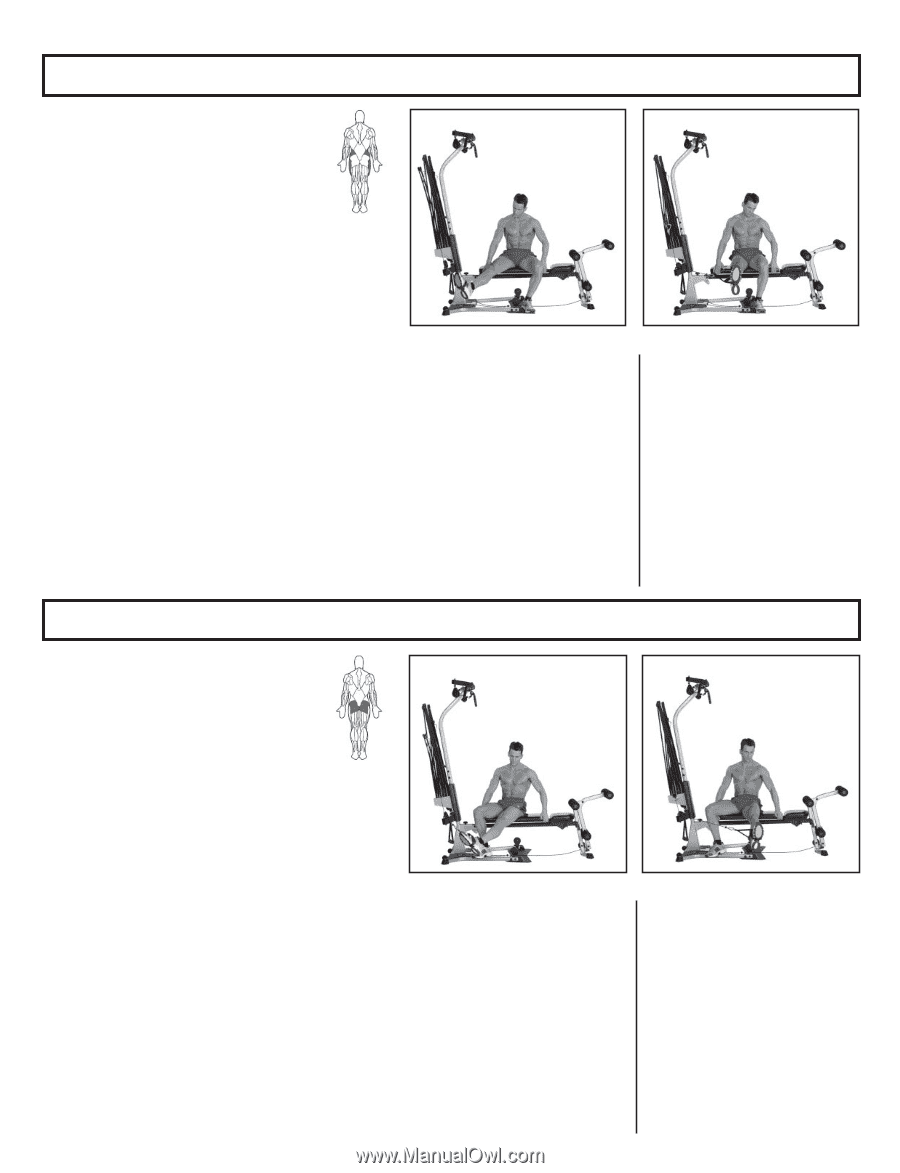
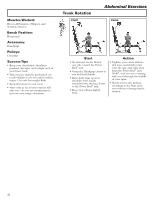
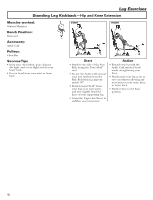
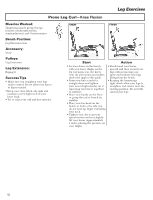
Leg Exercises Seated Hip Adduction Muscles Worked: Adductor Longus and Gluteus Medius Bench Position: Horizontal Accessory: Ankle Cuff Pulleys: Chest Bar Success Tips • Do not cross your leg with the attached Cuff in front of your stabilized leg. • Keep your abs tight, and do not lift your hips or excessively arch your back. • Keep your spine straight and your hips level-do not raise your hips during motion. • Use only a small range of motion. START FINISH Start Action • Sit sideways on the Bench, and • Slowly allow your leg with the attach an Ankle Cuff to your ankle attached Cuff to move inward closest to the Power Rod® unit. toward the center, as you face • Sit far enough from the Power Rod® unit to maintain tension in forward, keeping your hips and spine perfectly still. the cable at the start of the exer- • Keeping your leg still, slowly cise. move it back to the Start • Lift your cuffed leg in front of you at a 45o angle from your trunk (toward the Power Rod® unit)- position. do not lock your knee. • You may hold onto the Bench for added stability. Seated Hip Abduction Muscles worked: Piriformis and Gluteus Maximus Bench Position: Flat Bench Forward Accessory: Ankle Cuff Pulleys: Chest Bar Success Tips • Keep your spine straight and your hips level-do not raise your hips during the motion. • Use only a small range of motion. • Keep your hips motionless throughout this exercise. START FINISH Start • Sit sideways on the Bench, and secure an Ankle Cuff to your ankle farthest from the Power Rod® unit. • Sit far enough from the Power Rod® unit to maintain tension in the cable at the start of the exercise. • Lift your cuffed leg in front of you at a 45o angle from your trunk (toward Power Rod® unit)-do not lock your knee. • You may hold onto the Bench for added stability. Action • Slowly allow your cuffed leg to move outward away from the Power Rod® unit, keeping your hips and spine perfectly still. • Keeping your leg still, slowly move it back to the Start position. 49
-
 1
1 -
2
-
3
-
4
-
5
-
6
-
7
-
8
-
9
-
10
-
11
-
12
-
13
-
14
-
15
-
16
-
17
-
18
-
19
-
20
-
21
-
22
-
23
-
24
-
25
-
26
-
27
-
28
-
29
-
30
-
31
-
32
-
33
-
34
-
35
-
36
-
37
-
38
-
39
-
40
-
41
-
42
-
43
-
 44
44 -
 45
45 -
 46
46 -
 47
47 -
 48
48 -
 49
49 -
 50
50 -
 51
51 -
 52
52 -
 53
53 -
 54
54 -
55
-
56
-
57
-
58
-
59
-
60
-
61
-
62
-
63
-
64
-
65
-
66
-
67
-
68
-
69
-
70
-
71
-
72
-
73
-
74
-
75
-
76
-
77
-
78
-
79
-
80
 |
 |