Bowflex Revolution Owners Manual - Page 9
Attaching SpiraFlex, Resistance Packs - chest exercises
 |
View all Bowflex Revolution manuals
Add to My Manuals
Save this manual to your list of manuals |
Page 9 highlights
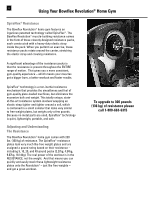
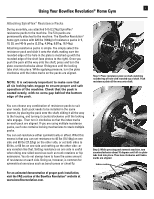
7 Using Your Bowflex Revolution® Home Gym Attaching SpiraFlex® Resistance Packs During assembly, you attached 5-lb (2.27kg) SpiraFlex® resistance packs to the machine. The 5-lb packs are permanently attached to the machine. The Bowflex Revolution® home gym comes with 220 lbs (100kg) of resistance packs in 5, 10, 20, and 40-lb packs (2.27kg, 4.54kg, 9.07kg, 18.14kg). Attaching resistance packs is simple. You simply select the resistance pack and slide it onto the shaft, making sure the rounded edge of the hole in the plate is matched up with the rounded edge of the shaft (see photos to the right). Once you push the pack all the way onto the shaft, press and turn the plate counterclockwise about 10 degrees until the locking tabs click into place. While applying pressure, turn the plate clockwise until the index marks on the packs are aligned. NOTE: It is extremely important to make sure that all six locking tabs engage to ensure proper and safe operation of the machine. Check that the pack is seated evenly, with no extra gap behind the bottom edge of the pack. You can choose any combination of resistance packs to suit your needs. Each pack needs to be installed in the same manner, by placing the pack onto the shaft, sliding it all the way to the housing, and turning it counterclockwise until the locking tabs engage. Then turn it clockwise so that the index marks on each pack are aligned. If you are using multiple resistance packs, each one contains locking mechanisms to stack multiple packs. You can set resistance either symmetrically or offset. What this means is that you can set resistance to 40 lbs (18.14kg) on one side and 60 lbs (27.22kg) on the other side, or set both sides to 60 lbs, or 60 lbs on one side and nothing on the other side--or any variation like that. Setting resistance on one side is useful when doing one-sided exercises such as trunk rotations or hip extensions. You do not always have to have the same amount of resistance on each side. Doing so, however, is common for symmetrical exercises such as bench press or chest fly. For an animated demonstration of proper pack installation, visit the FAQ section of the Bowflex Revolution® website at www.bowflexrevolution.com. Step 1: Place resistance plate on shaft, matching rounded top of hole with rounded top of shaft. Push resistance plate all the way onto shaft. Step 2: While pressing pack towards machine, turn counterclockwise about 10 degrees until all six plate tabs lock into place. Then turn clockwise until index marks are aligned. Index marks
-
 1
1 -
2
-
3
-
 4
4 -
 5
5 -
 6
6 -
 7
7 -
 8
8 -
 9
9 -
 10
10 -
 11
11 -
 12
12 -
 13
13 -
 14
14 -
15
-
16
-
17
-
18
-
19
-
20
-
21
-
22
-
23
-
24
-
25
-
26
-
27
-
28
-
29
-
30
-
31
-
32
-
33
-
34
-
35
-
36
-
37
-
38
-
39
-
40
-
41
-
42
-
43
-
44
-
45
-
46
-
47
-
48
-
49
-
50
-
51
-
52
-
53
-
54
-
55
-
56
-
57
-
58
-
59
-
60
-
61
-
62
-
63
-
64
-
65
-
66
-
67
-
68
-
69
-
70
-
71
-
72
-
73
-
74
-
75
-
76
-
77
-
78
-
79
-
80
-
81
-
82
-
83
-
84
-
85
-
86
-
87
-
88
 |
 |
