Brother International 4200CN Quick Setup Guide - English - Page 15
Load Paper in the Paper Tray
 |
UPC - 012502607458
View all Brother International 4200CN manuals
Add to My Manuals
Save this manual to your list of manuals |
Page 15 highlights
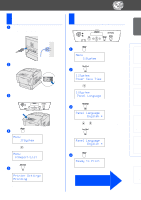
Step 1 Setting Up Your Printer 3 Load Paper in the Paper Tray 1 Pull the paper tray out until it stops. Lift up the front of the paper tray slightly and then remove it completely from the printer. 5 Align the side paper guides with the paper. Paper Tray 2 Remove the protective packing. 6 Put the paper tray back in the printer. Protective Packing 3 Slide the side paper guides out. Lift the end paper guide and insert it into the slot of the paper size you want to load. Paper Guide End Paper Guide 4 Load paper in the paper tray. Make sure that all the paper is under the tabs. MAX Up to here 14
-
 1
1 -
2
-
3
-
4
-
5
-
6
-
7
-
8
-
9
-
 10
10 -
 11
11 -
 12
12 -
 13
13 -
 14
14 -
 15
15 -
 16
16 -
 17
17 -
 18
18 -
 19
19 -
 20
20 -
21
-
22
-
23
-
24
-
25
-
26
-
27
-
28
-
29
-
30
-
31
-
32
-
33
-
34
-
35
-
36
-
37
-
38
-
39
-
40
-
41
 |
 |

14
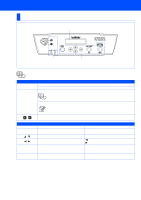
Setting Up Your Printer
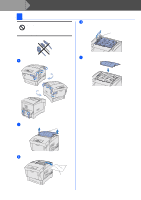
1
Pull the paper tray out until it stops.
Lift up the front of the paper tray slightly and
then remove it completely from the printer.
2
Remove the protective packing.
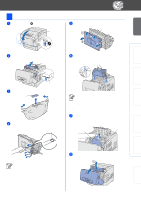
3
Slide the side paper guides out.
Lift the end paper guide and insert it into the
slot of the paper size you want to load.
4
Load paper in the paper tray.
Make sure that all the paper is under the
tabs.
5
Align the side paper guides with the paper.
6
Put the paper tray back in the printer.
3
Load Paper in the Paper Tray
Paper Tray
Protective Packing
End Paper Guide
Paper Guide
MAX
Up to here
Step 1