Brother International BM3700 Users Manual - English and Spanish - Page 10
The Controls
 |
View all Brother International BM3700 manuals
Add to My Manuals
Save this manual to your list of manuals |
Page 10 highlights
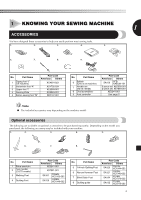
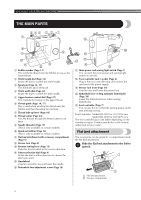
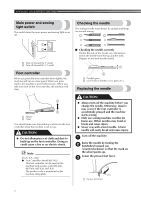
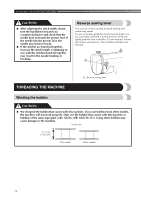
KNOWING YOUR SEWING MACHINE Lower the presser foot lever and fix the 5 presser foot onto the shank. If the presser foot is in the correct place, the bar should snap in. ■ Presser foot installation orientation 1 2 1 Shank 2 Bar THE CONTROLS CAUTION ● If the presser foot is not installed with the correct orientation, the needle may strike the presser foot, which may bend or break the needle and cause injury. Pattern selection dial CAUTION ● When you use the pattern selection dial to choose a pattern, raise the needle by turning the handwheel toward you (counterclockwise) so that the mark on the wheel points up. If the needle is in the down position when you turn the pattern selection dial, the needle, presser foot or fabric may be damaged. To choose a stitch, simply turn the pattern selection dial in either direction. The next section shows recommended stitch lengths and widths. Stretch stitching Raise the needle by turning the handwheel toward you (counterclockwise) so that the mark on the wheel points up. Setting the stitch length dial to " " changes the selected pattern to a stretch stitch. 2 1 1 Pattern selection dial 2 Chosen pattern number 9
-
 1
1 -
2
-
3
-
4
-
 5
5 -
 6
6 -
 7
7 -
 8
8 -
 9
9 -
 10
10 -
 11
11 -
 12
12 -
 13
13 -
 14
14 -
 15
15 -
16
-
17
-
18
-
19
-
20
-
21
-
22
-
23
-
24
-
25
-
26
-
27
-
28
-
29
-
30
-
31
-
32
-
33
-
34
-
35
-
36
-
37
-
38
-
39
-
40
-
41
-
42
-
43
-
44
-
45
-
46
-
47
-
48
-
49
-
50
-
51
-
52
-
53
-
54
-
55
-
56
-
57
-
58
-
59
-
60
-
61
-
62
-
63
-
64
-
65
-
66
-
67
-
68
-
69
-
70
-
71
-
72
-
73
-
74
-
75
-
76
-
77
-
78
-
79
-
80
-
81
-
82
-
83
-
84
-
85
-
86
-
87
-
88
-
89
-
90
-
91
-
92
-
93
-
94
-
95
-
96
-
97
-
98
-
99
-
100
-
101
-
102
-
103
-
104
 |
 |
