Brother International DA-9270 Instruction Manual - English - Page 14
Threading the lower threads, Threading the upper threads
 |
View all Brother International DA-9270 manuals
Add to My Manuals
Save this manual to your list of manuals |
Page 14 highlights
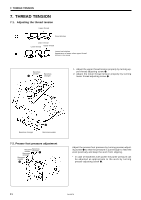
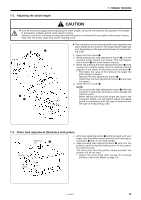
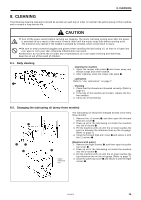
5. PREPARATION BEFORE SEWING 5-3. Threading the lower threads CAUTION ¡ Turn off the power switch before threading the upper thread, otherwise the machine may operate if the treadle is pressed by mistake, which could result in injury. Pass the lower threads as shown in the figure below. Needle hole position Needle hole position 2 3 (1) 1 (3) 50 - 60mm 3 2 1 12 3 1 2 3 1 2 3 12 3 5-4. Threading the upper threads CAUTION ¡ Turn off the power switch before threading the upper thread, otherwise the machine may operate if the treadle is pressed by mistake, which could result in injury. Pass the upper threads as shown in the figure below. 4 5 6 45 6 6 5 4 1 2 3 50 - 60mm 6 5 4 4 5 6 12 3 6 4 5 1 2 3 9 DA-9270
-
 1
1 -
2
-
3
-
4
-
5
-
6
-
7
-
8
-
 9
9 -
 10
10 -
 11
11 -
 12
12 -
 13
13 -
 14
14 -
 15
15 -
 16
16 -
 17
17 -
 18
18 -
 19
19 -
20
-
21
-
22
-
23
-
24
-
25
-
26
-
27
-
28
 |
 |

DA-9270
9
¡
Turn off the power switch before threading the upper thread, otherwise the machine may operate if the
treadle is pressed by mistake, which could result in injury.
CAUTION
5-3.
Threading the lower threads
Pass the lower threads as shown in the figure below.
5. PREPARATION BEFORE SEWING
Pass the upper threads as shown in the figure below.
¡
Turn off the power switch before threading the upper thread, otherwise the machine may operate if the
treadle is pressed by mistake, which could result in injury.
CAUTION
5-4.
Threading the upper threads
2
3
1
1
2
3
1
Needle hole
position
Needle hole
position
1
2
2
1
(3)
1
2
3
1
2
4
5
6
5
4
3
2
4
5
6
12
3
4
5
6
4
5
6
50 - 60mm
50 - 60mm
(1)
3
2
3
3
3
6
1
5
6
4