Brother International GT-361 Basic Instruction Manual - English - Page 22
Control Panel, Head Cleaning Button - machines
 |
View all Brother International GT-361 manuals
Add to My Manuals
Save this manual to your list of manuals |
Page 22 highlights
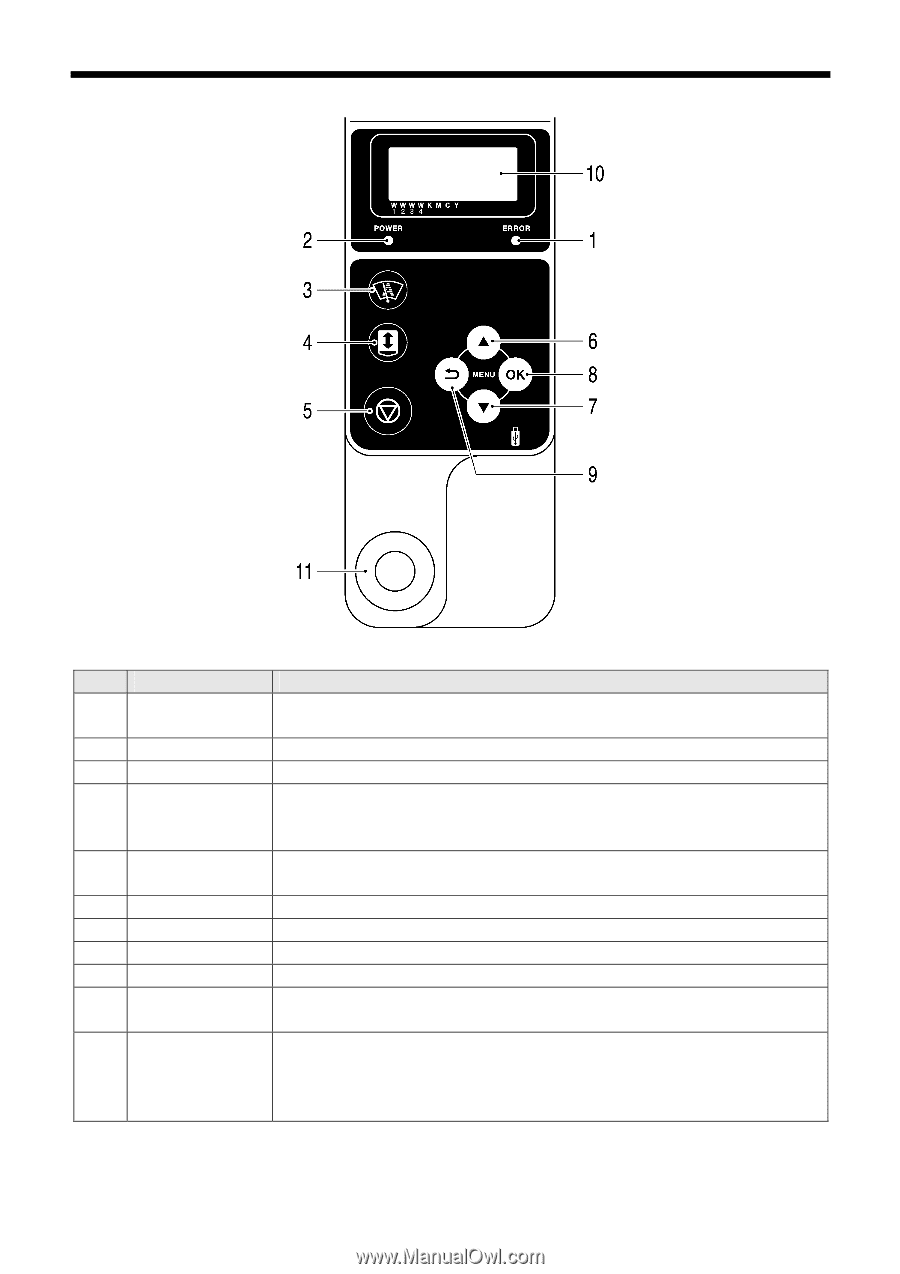
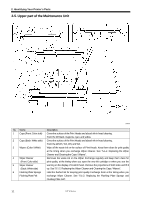
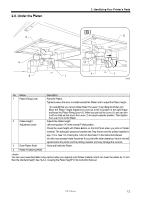
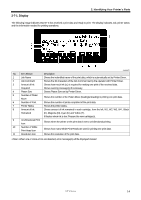
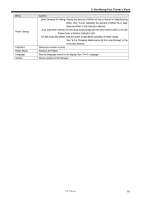
2. Identifying Your Printer's Parts 2-7. Control Panel 0050Y No. Name Description 1 Error Lamp OFF: no errors ON: one or more errors have been detected. See "7-4. Error messages" in the Instruction Manual. 2 Power Lamp ON: shows the power is ON. 3 Head Cleaning Button Cleans all the Print Heads with normal cleaning. (the number of cleaning depends on the model). 4 Platen Button Loads / Ejects the Platen. Press this button when you check the adequate height of the Platen after you change the height. See "4-5. Placing the T-shirt on the Platen" in the Instruction Manual. 5 Stop Button Cancels printing or Print Head cleaning. Returns to Standby mode. 6 Up Button Selects the previous (upper) item. Increases a numeric value. Opens the Menu display. 7 Down Button Selects the next (lower) item. Decreases a numeric value. Opens the Menu display. 8 OK Button Executes the selected command. Opens the Menu display. Clears the error status. 9 Back Button Returns to the previous display. Opens the Menu display. 10 Display Displays the Job Comment of the print data received, the status of the printer, and the menu items for various settings. 11 Print Button Indicates the print data status and starts the print. OFF: No print data has been received Flashing: Receiving a print data ON: Print data is ready to print. On machine initialization these lamps have a 30-second self check time. 13 GT-3 Series
-
 1
1 -
2
-
3
-
4
-
5
-
6
-
7
-
8
-
9
-
10
-
11
-
12
-
13
-
14
-
15
-
16
-
 17
17 -
 18
18 -
 19
19 -
 20
20 -
 21
21 -
 22
22 -
 23
23 -
 24
24 -
 25
25 -
 26
26 -
 27
27 -
28
-
29
-
30
-
31
-
32
-
33
-
34
-
35
-
36
-
37
-
38
-
39
-
40
-
41
-
42
-
43
-
44
-
45
-
46
-
47
-
48
-
49
-
50
-
51
-
52
-
53
-
54
-
55
-
56
 |
 |