Brother International LS2-B891 Instruction Manual - Page 4
Ziehen Sie die beiden Schrauben
 |
View all Brother International LS2-B891 manuals
Add to My Manuals
Save this manual to your list of manuals |
Page 4 highlights
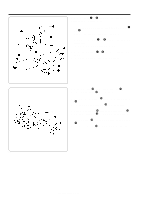
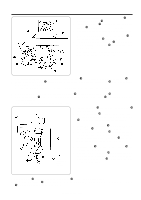
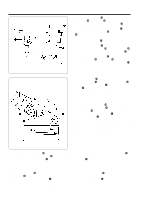
Projection Vorsprung Saillie Proyección Grooves Kerben Rainures Ranuras 10. Install the needle clamp @1 for twin-needle use to the needle bar @0 with the bolt @.2 11. Install the two needles to the needle clamp @1. 10. Bringen Sie die Nadelspannvorrichtung @1 für die Doppelnadel mit der Schraube @2 an der Nadelstange @0 an. 11. S e t z e n S i e d i e b e i d e n N a d e l n i n d i e Nadelspannvarrichtung @1 ein. 10. Installer le pince-aiguilles @1 pour l'utilisation avec deux aiguilles sur la barre à aiguille @0 à l'aide de la boulon @.2 11. Installer les deux aiguilles sur le pince-aguilles @1. 10. Instale la abrazadera de aguja @1 para dos agujas en la barra de agujas @0 con el perno @.2 11. Instale las dos agujas en la abrazadera de agujas @1. 12. Pass the lower shaft @3 for twin-needle use through horizontal hook base L !4 and horizontal hook base R !.6 13. Tighten the two set screws !1, so that the front set screw !1 is at screw stop B when seen from the machine pulley turning direction. 14. Carry out the adjustments described in sections 13-13, 13-1-4, 13-1-5, 13-1-7 and 13-3 of the B892 Instruction Manual. 12. Setzen Sie die untere Welle @3 für die Doppelnadel in die horizontale Greiferbasis L !4 und in die horizontale Greiferbasis R !6 ein. 13. Ziehen Sie die beiden Schrauben !1 fest, so daß die vordere Schraube !1 am Schraubenanschlag B ansteht, wenn von der Riemenscheibendrehrichtung her gesehen. 14. Führen Sie die in den Abschnitten 13-1-3, 13-1-4, 131-5, 13-1-7 und 13-3 der Bedienungsanleitung für die B892 beschriebenen Einstellungen aus. 12. Faire passer l'arbre inférieur @3 pour l'utilisation avec deux aiguilles par la base de crochet horizontal gauche !4 et la base de crochet horizontal droite !.6 13. Serrer les deux vis de fixation !1 de manière que la vis de fixation !1 se trouve à la butée de vis B lorsqu'on regarde dans le sens de rotation de la poulie de machine. 14. Effectuer les réglages décrits aux sections 13-1-3, 13-1-4, 13-1-5, 13-1-7 et 13-3 du mode d'emploi du modèle B892. 12. Pase el eje inferior @3 para dos agujas a través de la base L del gancho horizontal !4 y la base R del gancho horizontal !.6 13. Apriete los dos tornillos de fijación !1, de manera que el tornillo de fijación delantero !1 se encuentren en el tope B del tornillo visto desde la dirección de giro de la polea de la máquina. 14. Realice los ajustes descritos en las secciones 13-1-3, 13-1-4, 13-1-5, 13-1-7 y 13-3 del Manual de instrucciones B892. 4 CONVERSION PARTS SET
-
 1
1 -
 2
2 -
 3
3 -
 4
4 -
 5
5 -
 6
6 -
 7
7 -
 8
8
 |
 |
