Brother International MFC 3100C Quick Setup Guide - English - Page 1
Brother International MFC 3100C - Inkjet Multifunction Manual
 |
UPC - 012502565819
View all Brother International MFC 3100C manuals
Add to My Manuals
Save this manual to your list of manuals |
Page 1 highlights
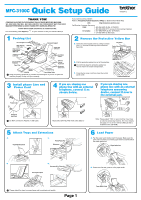
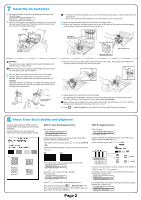
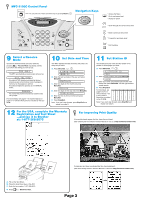
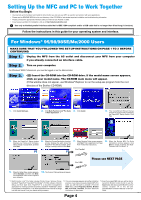
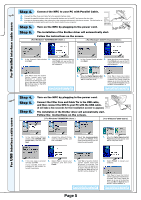
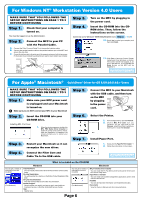
MFC-3100C Quick Setup Guide versionC THANK YOU! CONGRATULATIONS ON PURCHASING THE ULTIMATE BROTHER MACHINE. WE ARE SURE YOU WILL BE THRILLED WITH THE CONVENIENT WAY YOUR NEW MACHINE PERFORMS SO MANY TASKS WITH DAZZLING RESULTS! Follow these simple instructions in numerical order. For more details, press Reports, 1 on your machine or see your Owner's Manual. 1 Packing List Ink Cartridges Filter Core for USB Cable Filter Core for Bi-directional IEEE 1284 Cable Tie Telephone Line Cord Document Support Paper Wire Extension Card Stock Support Document Wire Extension Paper Tray Owner's Manual Test Sheet (For USA Only) Software License Agreement Accessory Order Form CD-ROM Quick Setup Guide Keep the packing materials for possible future transport. If you do not pack the machine properly, it may void your warranty. If you cannot solve a problem: Refer to Frequently Asked Questions (FAQs) on Brother World Wide Web; URL: http://solutions.brother.com Call Brother Customer Service at; USA: 1-800-284-4329 (9 AM - 5 PM EST) 1-800-284-3238 (TTY service for the hearing impaired) In Canada: 1-877-BROTHER (8 AM - 8 PM EST) 1-514-685-6464 (in Montreal) 2 Remove the Protective Yellow Bar A. Open the control panel cover by pulling it toward you (1), and then lift the top cover toward the back (2). Top Cover Control Panel Cover B. Pull the protective yellow bar out of the machine. Do not throw away the protective yellow bar. You will need it for future transportation. C. Close the top cover, and then close the control panel cover. Protective Yellow Bar 3 Install phone Line and Power Cord 4 If you are sharing one phone line with an external telephone, connect it as shown below. If you are sharing one phone line with an external telephone answering device, connect it now to the external jack. Power Cord Telephone Line Cord Do NOT connect the Parallel or USB cable. Must select EXT.TEL/TAD mode. (See Step 9.) 5 Attach Trays and Extensions A. Paper Wire Extension C. Plastic Paper Tray Extension Note: Please select "TAD" on your machine if you have an external answering machine. (For more details, see page 2-11 to 2-13 in Owner's Manual that is included on the CD-ROM.) 6 Load Paper A. Fan the paper well. Gently insert the paper. Make sure the print side is toward you and the paper level is stacked below the paper guide line. Paper Guide Line B. D. Document Wire Extension Document Support Please attach the trays to prevent jams and to maintain print quality. Page 1 B. Press and slide the guide to fit the paper width. Paper Width Guide
-
 1
1 -
 2
2 -
 3
3 -
 4
4 -
 5
5 -
 6
6
 |
 |