Brother International MFC-820CW Software Users Manual - English - Page 80
Scan to File, If you want the scanned data in color, choose color in scan type on
 |
View all Brother International MFC-820CW manuals
Add to My Manuals
Save this manual to your list of manuals |
Page 80 highlights
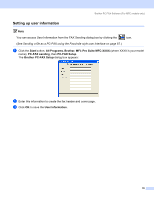
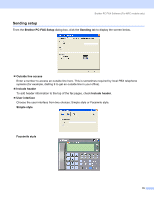
Network Scanning (For models with built-in network support) Scan to File 4 When you choose Scan to File, you can scan a black and white or color document and send it directly to a PC you designate on your network. The file will be saved in the folder and file format that you have configured in ControlCenter2. You can change the Scan configuration. (See File on page 54.) a Load your document. b Press the (Scan) key. c Press a or b to choose Scan to File. Press Menu/Set, Set or OK. d Press a or b to choose the destination PC you want to send to. Press Menu/Set, Set or OK. If the LCD prompts you to enter a PIN number, enter the 4-digit PIN number for the destination PC on the control panel. Press Menu/Set, Set or OK. e Press Black Start or Color Start. The machine starts the scanning process. Note If you want the scanned data in color, choose color in scan type on the Device Buttons tab of the ControlCenter2 configuration. If you want the scanned data in black and white, choose black and white in scan type on the Device Buttons tab of the ControlCenter2 configuration. (See SCAN on page 50.) 74
-
 1
1 -
2
-
3
-
4
-
5
-
6
-
7
-
8
-
9
-
10
-
11
-
12
-
13
-
14
-
15
-
16
-
17
-
18
-
19
-
20
-
21
-
22
-
23
-
24
-
25
-
26
-
27
-
28
-
29
-
30
-
31
-
32
-
33
-
34
-
35
-
36
-
37
-
38
-
39
-
40
-
41
-
42
-
43
-
44
-
45
-
46
-
47
-
48
-
49
-
50
-
51
-
52
-
53
-
54
-
55
-
56
-
57
-
58
-
59
-
60
-
61
-
62
-
63
-
64
-
65
-
66
-
67
-
68
-
69
-
70
-
71
-
72
-
73
-
74
-
 75
75 -
 76
76 -
 77
77 -
 78
78 -
 79
79 -
 80
80 -
 81
81 -
 82
82 -
 83
83 -
 84
84 -
 85
85 -
86
-
87
-
88
-
89
-
90
-
91
-
92
-
93
-
94
-
95
-
96
-
97
-
98
-
99
-
100
-
101
-
102
-
103
-
104
-
105
-
106
-
107
-
108
-
109
-
110
-
111
-
112
-
113
-
114
-
115
-
116
-
117
-
118
-
119
-
120
-
121
-
122
-
123
-
124
-
125
-
126
-
127
-
128
-
129
-
130
-
131
-
132
-
133
-
134
-
135
-
136
-
137
-
138
-
139
-
140
-
141
-
142
-
143
-
144
-
145
-
146
-
147
-
148
-
149
-
150
-
151
-
152
-
153
-
154
-
155
-
156
-
157
-
158
-
159
-
160
 |
 |
