Brother International MFC-8950DW Network User's Guide - English - Page 103
How to con the Secure Function Lock 2.0 settings using Web Based Management (web browser)
 |
View all Brother International MFC-8950DW manuals
Add to My Manuals
Save this manual to your list of manuals |
Page 103 highlights
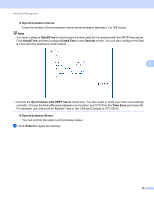
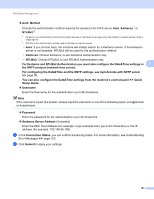
Web Based Management How to configure the Secure Function Lock 2.0 settings using Web Based Management (web browser) 5 Basic configuration 5 a Click Administrator on the machine's web page, and then click Secure Function Lock. b Choose On from Function Lock. Note To configure Secure Function Lock through the embedded web server, you have to enter the Administrator Password (four digit number). If the settings have been configured previously using the panel menu and you want to change the settings, you must fill in the blank in the Administrator Password box first. 5 c Enter an up to 15 digit alphanumeric group name or user name in the ID Number/Name box and then enter a four-digit password in the PIN box. d Uncheck the functions that you want to restrict in the Print box or the Others box. If you want to configure the maximum page count, check the On box in Page Limit, and then enter the number in the Max. box. Then click Submit. Note If you want to restrict the PC printing by PC user login name, click PC Print Restriction by Login Name and configure the settings. (See Restricting PC print by PC user login name uu page 97.) Scanning when using Secure Function Lock 2.0 5 The Secure Function Lock 2.0 feature allows the administrator to restrict which users are allowed to scan. When the scan feature is set to off for the public user setting, only users who have scan selected in the check box will be able to scan. To push scan from the control panel of the machine users must enter their PIN to access the scan mode. To pull scan from their computer, restricted users must also enter their PIN on the control panel of the machine before they can scan from their computer. If the PIN is not entered at the machines control panel the user will get an error message on their computer when they attempt to pull scan. 96
-
 1
1 -
2
-
3
-
4
-
5
-
6
-
7
-
8
-
9
-
10
-
11
-
12
-
13
-
14
-
15
-
16
-
17
-
18
-
19
-
20
-
21
-
22
-
23
-
24
-
25
-
26
-
27
-
28
-
29
-
30
-
31
-
32
-
33
-
34
-
35
-
36
-
37
-
38
-
39
-
40
-
41
-
42
-
43
-
44
-
45
-
46
-
47
-
48
-
49
-
50
-
51
-
52
-
53
-
54
-
55
-
56
-
57
-
58
-
59
-
60
-
61
-
62
-
63
-
64
-
65
-
66
-
67
-
68
-
69
-
70
-
71
-
72
-
73
-
74
-
75
-
76
-
77
-
78
-
79
-
80
-
81
-
82
-
83
-
84
-
85
-
86
-
87
-
88
-
89
-
90
-
91
-
92
-
93
-
94
-
95
-
96
-
97
-
 98
98 -
 99
99 -
 100
100 -
 101
101 -
 102
102 -
 103
103 -
 104
104 -
 105
105 -
 106
106 -
 107
107 -
 108
108 -
109
-
110
-
111
-
112
-
113
-
114
-
115
-
116
-
117
-
118
-
119
-
120
-
121
-
122
-
123
-
124
-
125
-
126
-
127
-
128
-
129
-
130
-
131
-
132
-
133
-
134
-
135
-
136
-
137
-
138
-
139
-
140
-
141
-
142
-
143
-
144
-
145
-
146
-
147
-
148
-
149
-
150
-
151
-
152
-
153
-
154
-
155
-
156
-
157
-
158
-
159
-
160
-
161
-
162
-
163
-
164
-
165
-
166
-
167
-
168
-
169
-
170
-
171
-
172
-
173
-
174
-
175
-
176
-
177
-
178
-
179
-
180
-
181
-
182
-
183
-
184
-
185
-
186
-
187
 |
 |